Table of Contents
1. Introduction
Trees are one of the most important elements of green infrastructure in cities. Climate change is specifically affecting trees in many European cities.[1] Increased heat waves and droughts, which can start early in the year and last throughout the growth season, are having a severe effect on trees. That’s why the purpose of our project is to collect data for the future about the drought that drives trees to dying.
So the target question to be answered is measuring the key features of the environment the trees grow in, for example: Soil moisture, Air humidity, Air temperature and Ground temperature and determining if is it favorable for them to develop.
If taken into consideration that taller trees are affected by drought stress and smaller trees would benefit from their subdominant position, conventional competition indices would, at the very least, momentarily underestimate the competitive status, growth, and mortality under these conditions.[2] The evidence brought by this statement might also influence our results, from the perspective that shorter trees may not be affected as much as the taller ones, because they are under the protection of the latter.
Drought is a natural and anthropogenic hazard common to all climate zones in the world, generally referred to as a sustained occurrence of below-average water availability due to precipitation deficit and soil moisture decline[6].
When speaking about soil moisture, we have to recognize it plays a major role in monitoring the intensity of droughts, therefore the Capacitive Soil Moisture Sensor comes into help, so we can collect data and analyze future dry seasons' effect on the health of the trees. Soil moisture is essential to crop growth and development and its deficit on short and long terms can lead to impacts on rainfed and subsistence agriculture.[5]
Since it is a hot topic, because of global warming and increasing temperature worldwide, leaves’ temperature might increase to a point which presents a risk to cause fires in the forest. Everything has a certain ignition point, the temperature at which wood ignites is 300°C.[7] Glass bottles and shards can bundle sunbeams like burning glass and cause dry leaves or grass to ignite. A large number of leaf temperature measurements were made, along with measurements of the ignition time and temperature, flame height, and flame duration For this measurements, the laser sensor GY-906 MLX90614ESF Infrared Temperature Sensor will be used.
The German forester and author Pether Wohlleben stated that in the next 10 years we could see 50% of the artificial forest dying because of bad management. Spruce forests only retain around 5% of rainwater due to soil compacting during harvesting.
Dry summers compound their plight, and therefore they are struggling to survive the exceeding weather temperatures and lacking sufficient soil moisture.[10] To be able to monitor these values, the DHT11 sensor comes into help, by collecting data about the temperature and humidity in the air.
2. Materials
2.1. ESP32
Operating the Fire-Alert station at a low cost, micro-controllers are the best option to control our sensors automatically.\\ Micro-controllers are small computers that contain one or more CPUs with memory and programmable input and output peripherals.
Looking at the two microcontrollers available, the choice between Arduino-UNO and ESP32 fell on the latter.
Espressif company that designs and makes the ESP32 made efforts to write software that bridges the hardware gap between the two micro-controllers. “ESP32-Arduino Core” is the responsible software that makes ESP32 compatible with Arduino. [11]
Although ESP32 is more complex than Arduino for beginners, it has a lower power-consuming system with integrated Wi-Fi and Bluetooth compatible with Arduino.
Since the station is battery-powered and data is uploaded using Wi-Fi, ESP32 is the best option.
A wide range of sensors can be controllable by ESP32.
In particular, the micro-controller used is ESP32-WROVER-B. It comes with a PCB antenna and features a 4 MB external SPI flash and an additional 8 MB SPI Pseudo static RAM .
There are two CPU cores in ESP32-WROVER-B, the CPU clock frequency is adjustable from 80 MHz to 240 MHz, and the sleep current, the current that ESP32 draws when it is in a deep sleep but has some standby power, is less than 5 µA.
The absolute maximum current drawn per GPIO is 40mA. [12] GPIOs are the pins to which the sensors are connected.
The operating temperature of ESP32 is between -40°C and 85°C, which is optimal for our station during winter and summer.
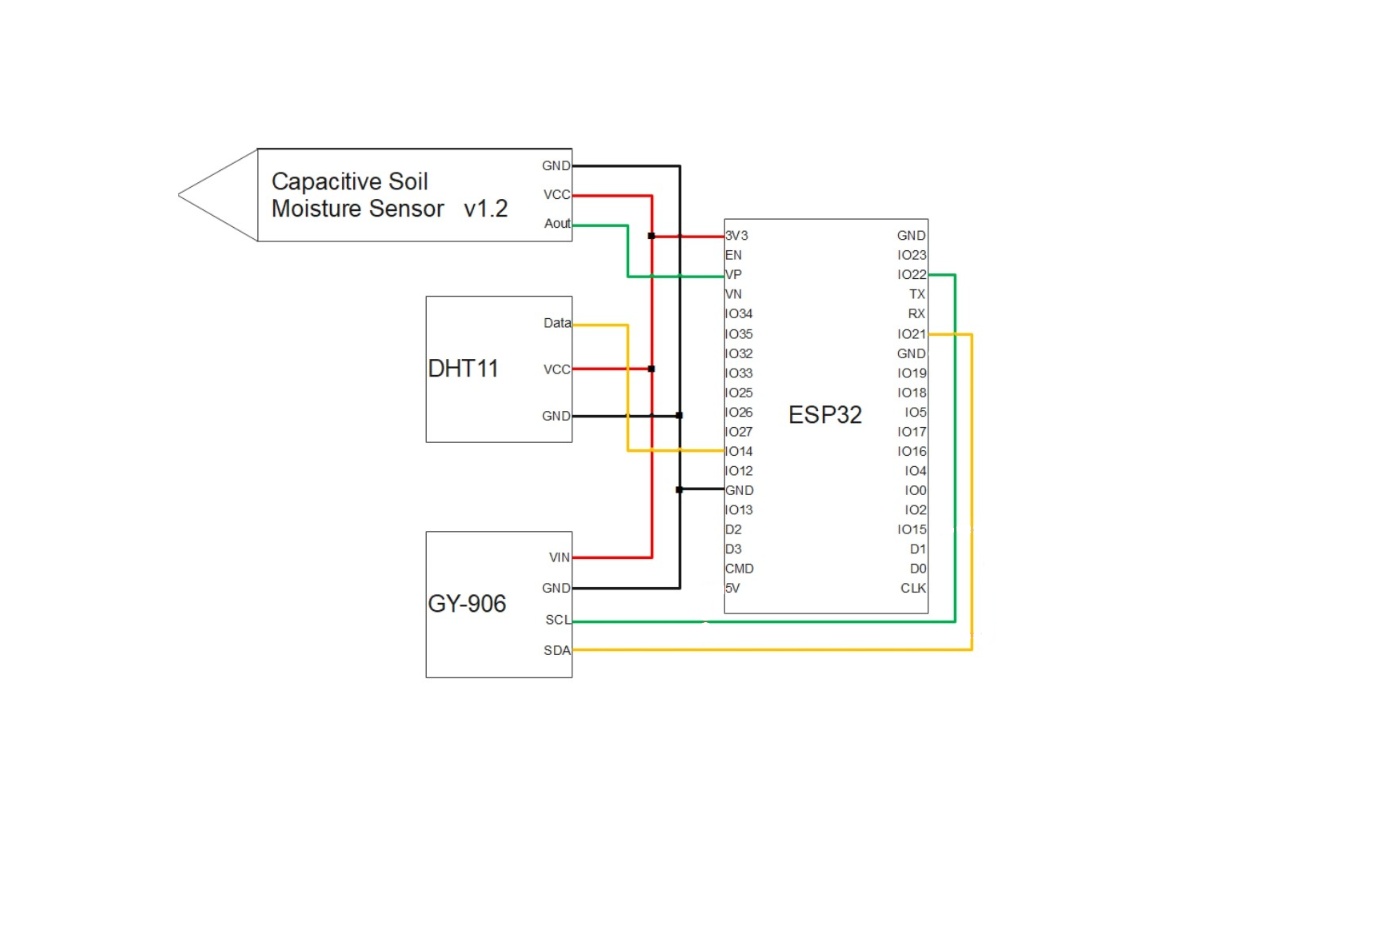
ESP32 Pinout
Using the following ESP32 pins for Fire-Alert station connection:
- VIN to power Arduino from another 9V battery.
- GND pins as ground pins.
- Pin 3V3 as output to power the sensors.
- GPIO Pins 14, 21, 22 and VP as input to collect the data from the sensors.

Figure 1 Pin layout detailed of the ESP32-DevkitC microcontroller.
2.2. DHT11
DHT11 is an ultra low-cost digital temperature and humidity sensor which can be connected easily to ESP32. It is able to detect temperature and also relative humidity.
The sensor consists of an NTC temperature measurement device to measure the temperature and a resistive moisture sensor to measure the relative humidity (RH) .
The sensor includes an 8-bit microcontroller to output the value of temperature and humidity as serial data. [13]
Advantages: Excellent long-term stability and high reliability. [13]
Product parameters: [13]
- Operating Voltage: 3.5V to 5.5V
- Operating current: 0.3mA (measuring) 60uA (standby)
- Output: Serial data
- Resolution: 8Bit
      Relative Humidity:
* 	Temperature Range: 0°C to 50°C
* 	Accuracy: ±1%
* 	Accuracy at 25°C ±5%RH
* 	Interchangeability: fully interchangeable
      Temperature:
* 	Accuracy: ±1°C
* 	Repeatability: ±0.2°C
* 	Range: 0°C ±50°C
Applications:
- Measure temperature and humidity
- Humidity and temperature regulator
- Local Weather station
- Automatic climate control
- Environment monitoring
- Temperature and humidity data collection
DHT11-Arduino Connection:
- The first left pin in the sensor is responsible for collecting the data from the sensor as output and transmitting it into pin 14 in ESP32 as input.
- The middle pin in the sensor is responsible for transmitting the voltage as input to power the sensor from pin 3V3 in ESP32 as output.
- The third pin on the right in the sensor is the ground pin connected to the GND pin in ESP32.
Placing the system:

Figure 2 Connection of the DHT11 with the ESP32, Photo by: Ziad Helou
Placing the DHT11 sensor is a bit tricky since it is not waterproof.
The best to protect the sensor is to hang it from the outside bottom of the plastic box to protect it from the rain, but the problem would be the water that comes from the heavy rain after hitting the ground, which can damage the sensor. For this purpose, the station should be over the ground surface by at least 10cm.
2.3. Capacitive Soil Moisture Sensor
As the name already suggests, a capacitive soil moisture sensor is a sensor which approximates the moisture content in the soil, by using the working principle of a capacitor . So it works by measuring the change in capacitance.
The v1.2 of our sensor is using the capacitive method instead of the resistive one, used in the previous version of the sensor. We are using the capacitive moisture sensor, because it is made of a corrosion resistant material giving it a long service life, so the sensor’s electrodes are not exposed and no electrical current flows between them, therefore making it the best moisture sensor.
Purpose of using the sensor: The capacitive soil moisture sensor is used by inserting it in the soil of the forest, around plants and trees, to make a low-cost real-time soil moisture monitoring possible, therefore helping us to adapt our values and bring corresponding results.

Figure 3 Connection of the Capacitive Soil Moisture with the ESP32, Photo by: Ziad Helou
Product parameters: [14]
- Operating voltage range : 3.3V
- Output analog Voltage: 0 ~ 3.0 VDC
- Operating current : 5mA (measuring) and 3µA (standby) [15]
- Supports 3-Pin Sensor interface (GND, VCC and AOUT)
- Interface: PH2.0-3P
Applications: [16]
- Soil moisture detection
- Intelligent agriculture
- Automatic watering of plants
BONUS - Tips and tricks:
Use silicon glue or some material for tubing it (i.e. rubber), in order to protect the circuits above the warning line, as they are not waterproof.
2.4. GY-906 MLX90614ESF Infrared Temperature Sensor
The GY-906 Infrared-Thermometer is a very simple, but highly precise, breakout board designed to measure special temperatures, contactless, via infrared light.
It can be used with Arduino or any microcontroller that can communicate with it through its I2C interface .
The main difference between this and most other thermometers is that the temperature reading is taken without touching the object whose temperature is being monitored. In our case, the sensor provides 2 values, one for Air Temperature and another one for Object Temperature, respectively - the ground, for our experiment.
Pinout Configuration:
- VIN (Power Supply) - can be used to power the sensor, typically using 5V
- GND (Ground) - the metal can also act as ground
- SCL (Serial Clock) - pin used for I2C Communication, that carries the clock signal
- SDA (Serial Data) - pin used for I2C Communication , to send and receive data

Figure 4 Connection of the Infrared temperature sensor with the ESP32, Photo by: Ziad Helou
Product parameters: [17]
- 3.3V Operating Voltage
- Operating Current : 2mA max (measuring) and 2.5µA (standby) [5]
- Factory calibrated in a wide temperature range: -40°C to +125˚C for sensor temperature and 70°C to +380˚C for object temperature
- 0.5 °C Accuracy (0-50 °C)
- Measurement resolution of 0.02°C
- I2C interface
- Optional (customizable) PWM and interrupt output
- Resolution down to 0.02°C (TWI output)
Applications: [18]
- Monitoring the temperature of something moving, like a spinning motor shaft or objects on a moving conveyor
- Temperature control in printers and copiers
- Automotive blind angle detection
- Multiple zone temperature control – up to 127 sensors
- Body temperature measurement
- Livestock monitoring
BONUS - Tips and tricks:
How far can it pick up temperature change?
We have to compensate the temperature measurement result with the distance in case you want more distance. Preferable size range would be 10 cm, so we can get reasonable values. [19]
2.5. Battery ELEGOO 9V
 |
|---|
Figure 5 Battery ELEGOO 9V Photo by: Ziad Helou |
In order to have continuous measurements, without interruptions, we must calculate the battery life with a discharge of 10%.
According to Battery Life Calculator [20], the life of the battery B(h) in hours is equal to the total capacity of the battery Capacity(Ah) in Amps hours divided by the output current taken from the battery I(Ah) in Amps hour.
The formula would look like:
Battery (h) = Capacity(Ah) / I(Ah)
Considering that our battery is a 9V nonchargeable alkaline battery, the capacity it can reach is of 550 mAh.[21] Converted to Ah, it would be 0.55 Ah.
The output current taken from the battery when it is working is the sum of the output current of all the sensors (DHT11 , Capacitive Soil Moisture, Infrared Temperature Sensor): 0.3mA + 5mA + 2mA = 7.3mA = 0.0073 A.
Speaking about the standby current, we have to take into consideration the ESP32 in this case, so the total sum of output current taken from the battery is:
5µA (ESP32) + 60µA (DHT11) + 3µA (Capacitive Soil Moisture Sensor) + 2.5µA (Infrared Temperature Sensor) = 70.5µA = 0.0000705 A.
For a range of 15 minutes or 900 seconds, the battery working time is in intervals of 18 seconds, followed by sleep mode/standby current for 882 seconds.
Putting it all together:
Battery Lifetime = 0.55 Ah / [(0.0073 A*18 s)/900 s + (0.0000705 A*882 s) / 900s] = 2557 hours.
So our 9V battery would last roughly 106.5 days, until it would be emptied entirely.
Considering discharging it when reaching 10%:
2557 hours – 255.7 hours = 2301.3 hours, meaning the battery would last 96 days, according to the appropriate discharge rate, so we can have continuous measurements.
3. Methods
3.1. Complete Code
 * AMC Group Z
 * Monitoring Drought Effects


#include <WiFi.h> //1
#include <PubSubClient.h> //2
#include <EEPROM.h> //3
#include <Adafruit_MLX90614.h> //4
#include <DFRobot_DHT11.h> //5
DFRobot_DHT11 DHT; //6

#define AOUT_PIN 36 //7
#define DHT11_PIN 14 //8
#define EEPROM_BYTES 2 //9
//#define RestartPin 27 //10
#define uS_TO_S_FACTOR 1000000 //10
#define TIME_TO_SLEEP  882 //11

RTC_DATA_ATTR int bootCount = 0; //12

Adafruit_MLX90614 mlx = Adafruit_MLX90614(); //13

int dry = 2677; //14
int wet = 977; //15

// WiFi
const char *ssid = "Vodafone-D285"; //16
const char *password = "JgDHNp4JrEejmGgA"; //17

// MQTT Broker
const char *mqtt_broker = "broker.emqx.io"; //18
const char *topic_1 = "soil_moisture_value_group_z"; //19
const char *topic_2 = "temperature_group_z"; //20
const char *topic_3 = "air_humidity_group_z"; //21
const char *topic_4 = "temperature2_group_z"; //22
const char *topic_5 = "ground_temperature_group_z"; //23

const int mqtt_port = 1883; //24

WiFiClient espClient; //25
PubSubClient client(espClient); //26

void callback(char *topic, byte *payload, unsigned int length) { //27
 Serial.print("Message arrived in topic: ");
 Serial.println(topic);
 Serial.print("Message:");
 for (int i = 0; i < length; i++) {
     Serial.print((char) payload[i]);
 }
 Serial.println();
 Serial.println("-----------------------");

}

void print_wakeup_reason(){ //28
  esp_sleep_wakeup_cause_t wakeup_reason;

  wakeup_reason = esp_sleep_get_wakeup_cause();

  switch(wakeup_reason)
  {
  case ESP_SLEEP_WAKEUP_TIMER: Serial.println("Wakeup caused by timer"); break;
  }
}

void setup() { //29

  EEPROM.begin(EEPROM_BYTES);
  Serial.begin(115200); //30
  while (!Serial); //31

  if (!mlx.begin()) { //32
    Serial.println("Error connecting to MLX sensor. Check wiring.");
    while (1);
  };
  delay(1000); //33

  ++bootCount; //34
  Serial.println("Boot number: " + String(bootCount));
  print_wakeup_reason();//35

  esp_sleep_enable_timer_wakeup(TIME_TO_SLEEP * uS_TO_S_FACTOR); //36
  Serial.println("Setup ESP32 to sleep for every " + String(TIME_TO_SLEEP) +
  " Seconds");

  Serial.println("Transmitting data."); //37
  delay(1000);
  WiFi.begin(ssid, password); //38
  while (WiFi.status() != WL_CONNECTED) { //39
    delay(1000);
    Serial.println("Connecting to WiFi.."); //40
    Serial.println("Connected to the WiFi network");

  //connecting to a mqtt broker
  client.setServer(mqtt_broker, mqtt_port); //41
  client.setCallback(callback);

  while (!client.connected()) {  //42
    String client_id = "esp32-client-";
    client_id += String(WiFi.macAddress());
    Serial.printf("The client %s connects to the public mqtt broker\n", client_id.c_str());

if (client.connect(client_id.c_str())) {  //43
    Serial.println("Public emqx mqtt broker connected");
    }
    else {  //44
    Serial.print("failed with state ");
    Serial.print(client.state());
    }
    delay(2000);
  }
 }
}

void loop() {  //45

  char soil_moisture_value[3];  //46
  char air_temperature[3];
  char air_humidity[3];
  char air_temperature2[3];
  char ground_temperature[3];

  int value = analogRead(AOUT_PIN);   //47
  int percHumidity = map(value, dry, wet, 0, 100);  //48

  delay(2000);

  if ((percHumidity > -5) && (percHumidity < 105)) { //49
     Serial.print("Soil Moisture Value: ");  //50
     Serial.println(percHumidity);

  dtostrf(percHumidity,1,0, soil_moisture_value);  //51
  client.publish(topic_1, soil_moisture_value);   //52
  }
  delay(2000);

  DHT.read(DHT11_PIN);
  Serial.print("Air Temperature: ");
  Serial.println(DHT.temperature);

  dtostrf(DHT.temperature,1,0, air_temperature);
  client.publish(topic_2, air_temperature);

  delay(2000);

  Serial.print("Air Humidity: ");
  Serial.println(DHT.humidity);

  dtostrf(DHT.humidity,1,0, air_humidity);
  client.publish(topic_3, air_humidity);

  delay(2000);

  Serial.print("Ambient temperature: ");
  Serial.println(mlx.readAmbientTempC(),0);

  dtostrf(mlx.readAmbientTempC(),1,0, air_temperature2);
  client.publish(topic_4, air_temperature2);

  delay(2000);

  Serial.print("Object temperature: ");
  Serial.println(mlx.readObjectTempC(),0);

  dtostrf(mlx.readObjectTempC(),1,0, ground_temperature);
  client.publish(topic_5, ground_temperature);

  delay(2000);

  Serial.println("Going to sleep now");
  delay(1000);

  Serial.flush();  //53
  esp_deep_sleep_start();
  Serial.println("This will never be printed");

  delay(2000);

}
3.2. Detailed Code Explanation
#include option:
1- Wifi.h supports Wi-Fi for ESP32.
2- PubSubClient Is a client library for MQTT messaging that allows you to send and receive MQTT messages.
3- EEPROM is an internal memory of ESP32 that allows keeping the memory when the board is turned off and on.
4- Adafruit MLX90614 Library for the MLX90614 sensors.
5- DFRobot Standard library for Temperature and Humidity sensor.
6- Defining DFRobot_DHT11 as DHT;
#define option
7- ESP32 pin VP is the GIOP36 (ADC1_0) that connects to the AOUT pin of the moisture sensor.
8- ESP32 pin 14 that connects to the responsible pin in DHT11 for collecting the data.
9- 64 is the Number of bytes to access in the flash memory.
10- Conversion factor for microseconds to seconds.
11- Time ESP32 will go to sleep in seconds.
- Here the time set is 15 minutes or 900 seconds, 18 seconds must be deducted from the total, which is the time required for the ESP32 to switch on, take the measurements and switch off. So, the total number of seconds will be 882.
12- This variable counts how many times ESP32 has woken up from a deep sleep.
- Here the bootCount is set to 0 so it starts the first counting from 1.
13- Create mlx or any other name as an object of class Adafruit_MLX90614. Passing object mlx as an argument to function Adafruit_MLX90614.
Integers: Integers are the primary data-type for number storage.
14- Defining dry as the integer of the value given by the Capacitive Soil Moisture Sensor when it is dry.
15- Defining wet as the integer of the value given by the Capacitive Soil Moisture Sensor when it is wet in water.
- When calibrating the sensor, if any values need to be changed, enough to change the integer values instead of changing them all over the code everywhere.
      WiFi: Configuration of WiFi credentials, to connect to the WiFi network.

*     A variable is declared as const char.
16- Username of the WiFi router used to connect the ESP32 online.
17- Password of the WiFi router.
MQTT Broker: Configuration of MQTT server.
18- MQTT broker server name.
19- Topic_1: Soil moisture value as a topic to be uploaded later to Node-RED.
20- Topic_2: Air temperature topic.
21- Topic_3: Air humidity topic.
22- Topic_4: Air temperature 2 topic.
23- Topic_5: Leaves temperature topic.
24- Port 1883 is an unsecure MQTT port used and has nothing to do with the router or the network being vulnerable. A third party can eavesdrop on the MQTT communication.
25- Declaring an object of class WiFiClient allows to establish a connection to a specific IP and port.
26- Declaring an object of class PubSubClient, which receives as input of the constructor the previously defined WiFiClient.
Callback Function
27- The callback function is when telling a piece of code what function you want under some condition. It needs to accept various arguments under the structure (topic, payload, length).
Length is length of the payload. The code prints the received topic and message. Serial.print() prints only the number or string, and Serial.println() prints it with a newline character.
28- The built-in timer wakes up ESP32 from deep sleep mode through a function.
29- The void setup() is a function created at the top of each program that initializes and sets the initial values.
30- Serial.begin is used to establish serial communication, a way to allow devices to talk to each other. Serial.begin is used to print something from Arduino. This also requires the serial.print function.
31- Wait for serial port to connect.
32- Initializing the serial communication with PC and call the begin() function which initializes I2C interface. This function optionally takes a parameter but if left empty it assumes the address is set to the default. [201]
33- Pauses the program for the amount of time specified in milliseconds.
34- Increment boot number and print it every reboot.
35- Printing the wakeup reason for ESP32.
36- Configuring the wake source and setting the ESP32 to wake each time at the specified time provided in the parameters.
37- Transmitting data printing when the ESP32 is awake.
38- Initializes the WiFi library's network settings and provides the current status.
39- Providing WiFi status. When connected to a WiFi network WL_CONNECTED is assigned.
40- Printing the successful connection to the WiFi.
41- Configuring with MQTT server before it can be used.
42- Using PubSubClient to connect to the public MQTT broker.
43- Printing the successful connection to MQTT broker when connected using if statement.
An if statement checks for a condition and executes a statement.
44- Printing the failed connection to MQTT broker when not connected using else statement.
An else clause will be executed if the condition in the “if” statement results is false.
45- The void loop() function loops consecutively after creating a setup() function, allowing the program to change and respond controlling ESP32.
46- Determining the biggest size of the character. Using 3 since the biggest number will be 100 for the percentage we are using.
47- Reads the value from the specified analog pin.
48- Using map to convert the value given by the Capacitive Soil Moisture Sensor when it is dry to 0 to indicate a 0% of soil moisture, and converting the wet value to 100 to indicate a 100% of soil moisture.
      An example provided in the arduino.cc documentation:
      Syntax:
      map(value, fromLow, fromHigh, toLow, toHigh) [22]
      Parameters:
      value: the number to map.
      fromLow: the lower bound of the value’s current range.
      fromHigh: the upper bound of the value’s current range.
      toLow: the lower bound of the value’s target range.
      toHigh: the upper bound of the value’s target range.
      So the value will be converted from “fromLow” to “toLow” and from “fromHigh” to “toHigh”.
49- Using give statement to print only if the values are between the range specified since the capacitive soil moisture sensor sometimes is giving results out of the range specified.
50- If the value between the range specified, printing the text provided before the value is shown in the serial monitor and the percentage value result.
51- “dtostrf” is the d to string f function includes four different parameters.
      dtostrf(float_value, min_width, num_digits_after_decimal, where_to_store_string)
*     float_value: floating point number that has to be converted to string. [23]
*     min_width: minimum field width. Since floating value could be 1 digit as a minimum (soil moisture value 9% or temperature 8 degrees), number 1 is used.
*     num_digits_after_decimal: number of digits after decimal. Since numbers are only integer, number 0 is used.
*     where_to_store_string: this is the character array. The biggest number of characters in explanation number 46 was determined to 3.
52- Publishing the character array to the MQTT topic assigned.
53- “esp_deep_sleep_start()” function is called to put ESP32 into deep sleep.
3.3. Working Principle
The target is to collect data from the sensors and visualize them in graphs using Grafana. There is a series of steps for each sensor connected to ensure that the data is received by ESP32, processed by Node-RED, stored in InfluxDB, and then charted using Grafana. A repeated automated process, as shown in the figure below.
 |
|---|
Figure 6 System drawing showing how the processes are linked together, by Ziad Helou |
Sensors must be configured to send data reports using MQTT. Each sensor is a client and connects to the MQTT server under a specific topic.
3.4. MQTT
MQTT is a subscribe messaging protocol designed for lightweight Machine to machine communications (M2M) . IBM company developed MQTT, and it is an open standard now. [24] The sensors transmit messages to the MQTT server. Clients can subscribe to the MQTT messages/topics. In other words, every client can receive any MQTT message after connecting or subscribing to a specific topic, as shown in the figure below, where Node-Red is the client, and the MQTT server is the broker forwarding all sensors messages.
 |
|---|
Figure 7 Representation of the connections going into and out of the MQTT server, by Ziad Helou |
Sensors use the MQTT protocol that contains data in a JSON format. We use Node-RED to convert the MQTT messages received from JSON to string.
3.5. Node-RED
Node-RED is an open-source programming tool that connects hardware devices, APIs, and online services.[25] It has an advantage for non-programmers to avoid heavy coding. Node-RED is suitable for making data control applications for web applications and IoT. Its development and execution environment are browser-based applications made with Node.js, which makes their development very easy by connecting the nodes.[26]
 |
|---|
| Figure 8 Setup on Node-RED explaining how the MQTT messages are received and sent to InfluxDB |
Using the “mqtt in” node to receive the MQTT messages based on topics assigned. Each message received is converted from JSON format to String using the “json” node. Sending the messages to InfluxDB using the “influxdb out” node based on the server credentials.
3.6. InfluxDB
InfluxDB is an open-source developed by the company InfluxData. InfluxDB is purpose-built to store and analyze large volumes of time series data. [27] InfluxDB establishes the connection between Node-RED and Grafana. As shown before, Node-Red is connected to InfluxDB. The last step to set up the system is to connect InfluxDB to Grafana using the same server credentials provided for linking InfluxDB to Node-RED.
3.7. Grafana
Grafana is a multi-platform open-source analytics and interactive visualization web application. It provides charts, graphs, and alerts to supported data sources. Grafana Labs is the company behind it. [28]
Steps to create Graphs:
- Creating a new dashboard
- Creating a new panel
- Reading sensors data needed from InfluxDB by selecting the measurement based on the topic defined in the “select measurement” in the “front” tab. Here is the importance of naming data topics according to the data type collected to avoid confusion.
- Fixing the settings in the tab on the right according to the visual requirements of each data.
- Applying and Saving
3.8. Schematic
3.9. Installation
The system consists of 3 sensors, ESP32, breadboard, and wires.
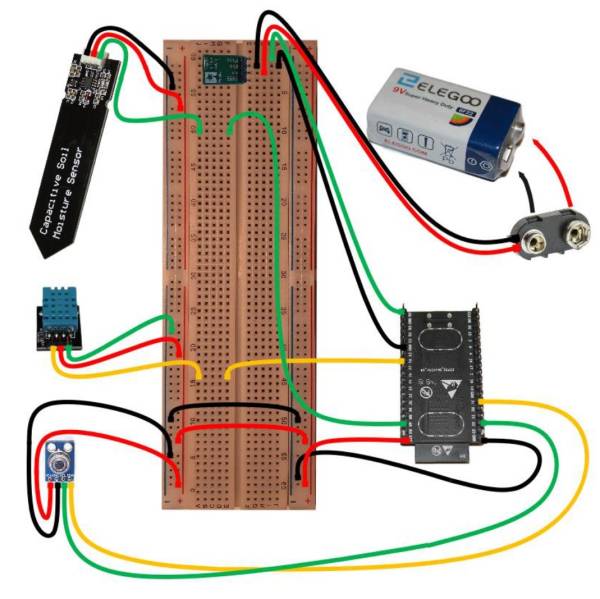 Figure 9 Full setup of connections with ESP32 of all sensors involved,
 by Ziad Helou
All the components used are not waterproof, except the capacitive soil moisture sensor from the lower part of the sensor, and they should be protected.
 |
|---|
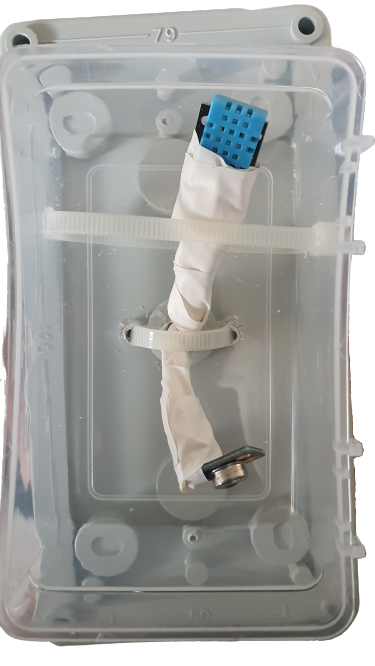
Figure 10 Sensors being covered with protective material, Photo by Ziad Helou |
To connect the DHT11 and the GY-906, we made an 8 inches hole in the bottom of the plastic box using an electric screwdriver to pass the wires to the outside, make them hang from the box, and protect them from the rain.
Taking into consideration that water might be percolating from the bottom sides of the box to the sensors during the rain, or a windy rain that might be spraying water to the sensors, a small plastic food container is attached from the bottom so the sensors can be protected from the sides.
 |
|---|
Figure 11 First phase of building the box, Photos by Ziad Helou |
We placed the ESP32, wires, and breadboard inside a waterproof plastic box.
To prevent damage to our system when droplets of water enter the box from the sides after a heavy rain, we made four small openings from the bottom of the plastic box so it can drain the water and prevent any accumulation.
The box must be protected from the sun radiation to prevent the high temperature inside it that might affect the battery. For that reason, a small plastic sheet is attached to the top of the box to give shading.
 |
|---|
Figure 12 Second phase of placing the components altogether, Photos by Ziad Helou |
To place the capacitive soil moisture sensor in the ground at a 50 cm depth, a 1-meter cable is soldered with the sensor and connected to the breadboard.
To prevent the capacitive soil moisture sensor from having water on the upper electrical part, a waterproof spray is applied with silicon to prevent any damage.
The cable of this sensor is passed through a special waterproof opening from the side of the box directly to the ground.
The final prototype of the machine is ready to be placed in the field and start collecting data.
4. Results
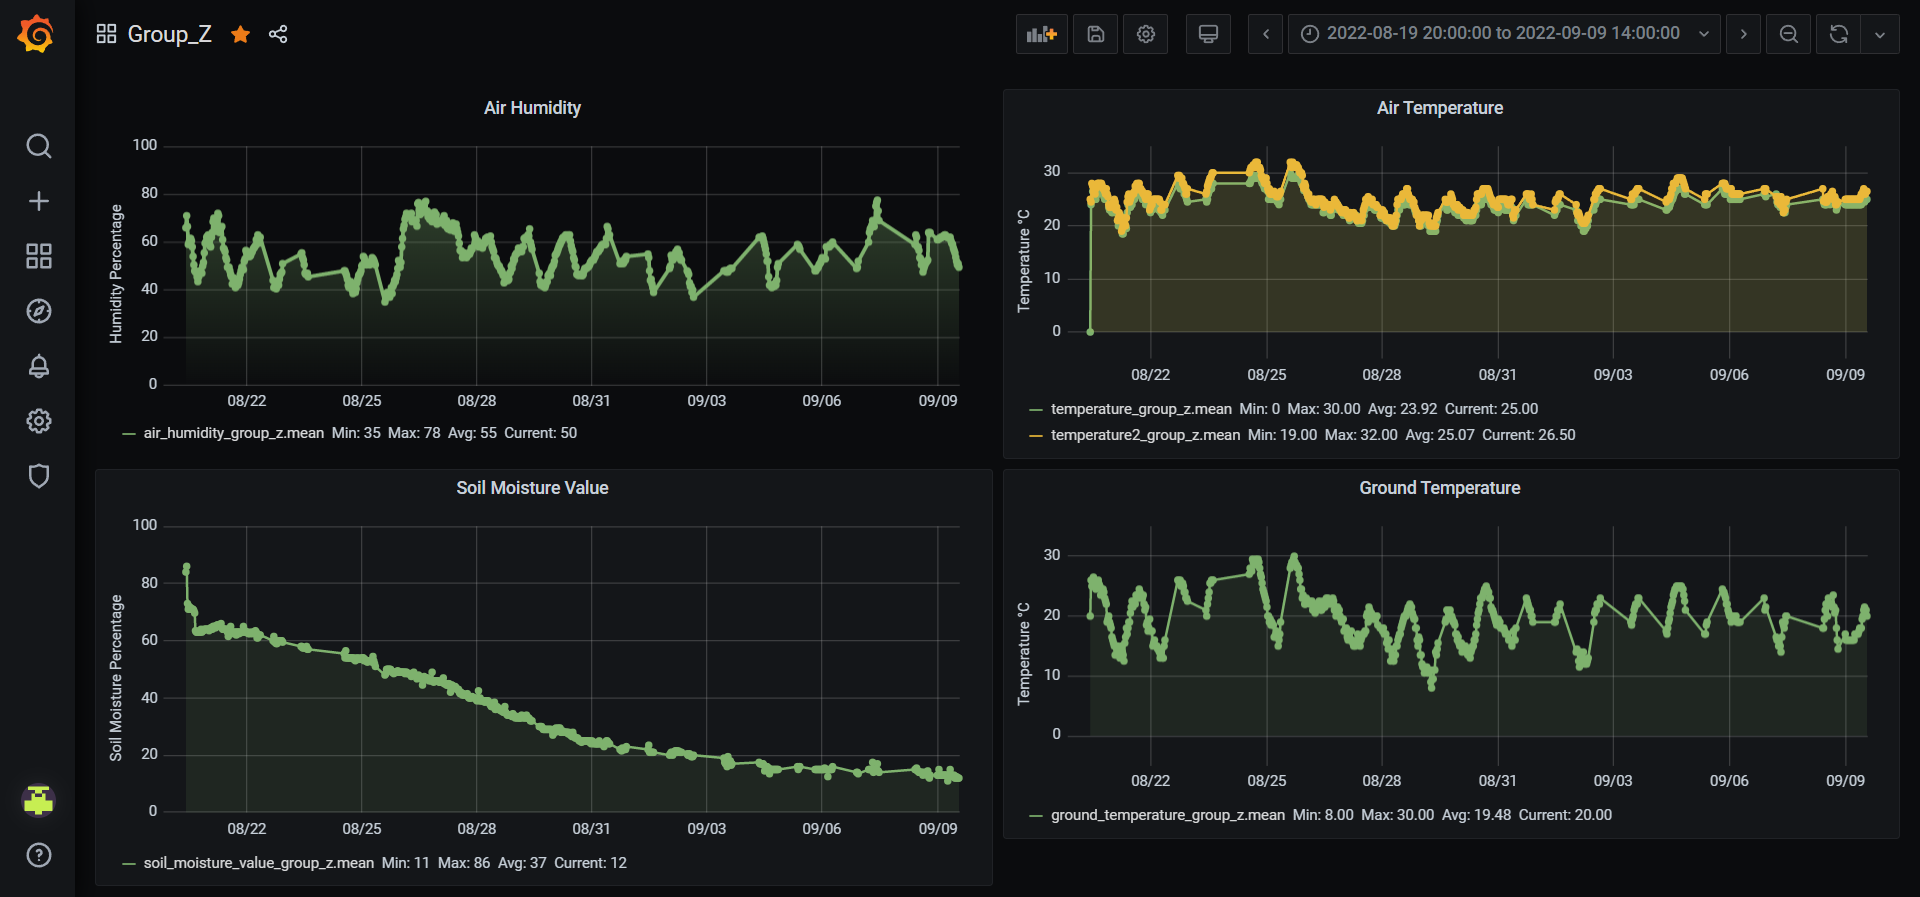 Figure 13 Testing Results in Grafana
We can see some spaces, intercepted as errors, between the results because of unknown interruption of the MQTT server connection.
In order to access the portal for more details, you can use: Grafana
Username: iotlab
Password: KampLintfort22
5. Discussion
Powering ESP32 directly with a 9v battery is not recommended [29]. Therefore we need to use a voltage regulator to supply the ESP32 with 5 volts only. Using the Pololu voltage regulator and a voltmeter, we regulated the voltage to 5.39 Volts, as shown in the picture below, so the voltage that was reaching the ESP32 was 5.39 Volts.
 |
|---|
Figure 14 Voltage values reaching the ESP32 when connected with a voltage regulator, Photo by Ziad Helou |
For more information about the battery problem and our several trials to fix it, please follow this link: Testing Attempts
6. Conclusion
The goal of this project was to be able to monitor the effects drought has on growing trees, by using specific sensors designed to measure parameters, like: air temperature and humidity, ground temperature, and soil moisture. All components (DHT11, Capacitive Soil Moisture, Infrared Temperature Sensor) were stacked in a box, also called a measuring station. As soon as the data is being uploaded using Wi-Fi connection, ESP32 is the best option as a microcontroller. Nevertheless, there were some issues faced when using this MCU, because the battery couldn’t supply enough voltage to run the ESP32 entirely. Because of that, we could not stick to powering the system using the 9V ELEGOO battery, so we admitted running it using the USB-Samsung 5V charger, which performed well in helping us to deliver proper results over a period of time. The code played a huge impact on the experiment because it was responsible for linking the sensors with the ESP32, and establishing the Wi-Fi connection, so the data can be reported using the MQTT protocol and processed by Node-RED, which is subscribed to the MQTT Broker. After the information has been collected and stored in InfluxDB, another important tool was significant for reading and visualizing it, more precisely – Grafana. Nevertheless, based on Grafana visualization of graphs, sometimes the sensors are not collecting data, so the machine has to be rebooted periodically. In conclusion, we can definitely say that some limitations for our station have been figured out, starting with the power supply from the battery that was an impediment for providing enough voltage to operate the system on a long time range and finishing with the poor availability of a nearby Wi-Fi connection, to be able to use it in the garden or forest. Overall, the station is applicable for small-scale objectives, by using Node-RED, InfluxDB and Grafana, because they are open-source and easy to handle for sharing data, but still, there is a place for improvement for larger projects.
7. Video
8. References
1 - Dagmar Haase, Rebecca Hellwig, Effects of heat and drought stress on the health status of six urban street tree species in Leipzig, Germany, Trees, Forests and People, Volume 8, 2022, 100252, ISSN 2666-7193, https://doi.org/10.1016/j.tfp.2022.100252
2 - Pretzsch, H., Schütze, G. & Biber, P. Drought can favour the growth of small in relation to tall trees in mature stands of Norway spruce and European beech. For. Ecosyst. 5, 20 (2018). https://doi.org/10.1186/s40663-018-0139-x
(3) Kohler, Martin & Schwarz, Julia & Nägele, Gregor & Bauhus, Jürgen. (2010). Can drought tolerance of Norway spruce (Picea abies (L.) Karst.) be increased through thinning?. European Journal of Forest Research. 129. 1109-1118. 10.1007/s10342-010-0397-9.
4 - Britta Eilmann, Andreas Rigling, Tree-growth analyses to estimate tree species' drought tolerance, Tree Physiology, Volume 32, Issue 2, February 2012, Pages 178–187, https://doi.org/10.1093/treephys/tps004
5 - Jose A. Marengo, Marcelo V. Galdos, Andrew Challinor, Ana Paula Cunha, Fabio R. Marin, Murilo dos Santos Vianna, Regina C. S. Alvala, Lincoln M. Alves, Osvaldo L. Moraes, Fabiani Bender, Drought in Northeast Brazil: A review of agricultural and policy adaptation options for food security, Climate Resilience and Sustainability, 10.1002/cli2.17, 1, 1, (2021).
6- Sheffield, J., Wood, E. F.: Global Trends and Variability in Soil Moisture and Drought Characteristics, 1950– 2000, from Observation-Driven Simulations of the Terrestrial Hydrologic Cycle. J Climate, 21(3), 432–458, 2008.
8 - Fletcher, Thomas H.; Pickett, Brent M.; Smith, Steven G.; Spittle, Gregory S.; Woodhouse, Megan M.; Haake, Elizabeth; Weise, David R. 2007. Effects of moisture on ignition behavior of moist California chaparral and Utah leaves. Combustion Science and Tech., 1183-1203
9 - Morse, T., Cundy, M., and Kytomaa, H., “Vehicle Fires Resulting from Hot Surface Ignition of Grass and Leaves,” SAE Technical Paper 2017-01-1354, 2017, https://doi.org/10.4271/2017-01-1354.
11 - https://techexplorations.com/guides/esp32/begin/esp32ard/
12 - https://www.espressif.com/sites/default/files/documentation/esp32-wrover-b_datasheet_en.pdf
14 - https://media.digikey.com/pdf/Data%20Sheets/DFRobot%20PDFs/SEN0193_Web.pdf
18 - MLX90614 Datasheet Melexis, https://www.sparkfun.com/datasheets/Sensors/Temperature/MLX90614_rev001.pdf
19 - https://www.youtube.com/watch?v=ii9CKZBbdZM
20 - https://www.electrical4u.net/calculator/battery-life-calculator-formula-example-formula/#:~:text=Battery%20life%20calculation%20formula%3A&text=Here%20the%20load%20current%20I,V(V)%20in%20volts.&text=The%20battery%20life%20is%20equal,divided%20by%20the%20total%20loads
22 - https://www.arduino.cc/reference/en/language/functions/math/map/
23 - https://www.programmingelectronics.com/dtostrf/
24 - https://www.eclipse.org/community/eclipse_newsletter/2014/february/article2.php
25 - https://nodered.org/
27 - https://docs.influxdata.com/influxdb/v1.8/concepts/crosswalk/