PicoCluster Installation
We decided to replace the preinstalled OS of the Pis in the pre-built PicoCluster with the newest version of the Raspberry Pi OS (32bit).
Installation
Flash OS
1. Download Raspberry Pi Imager.
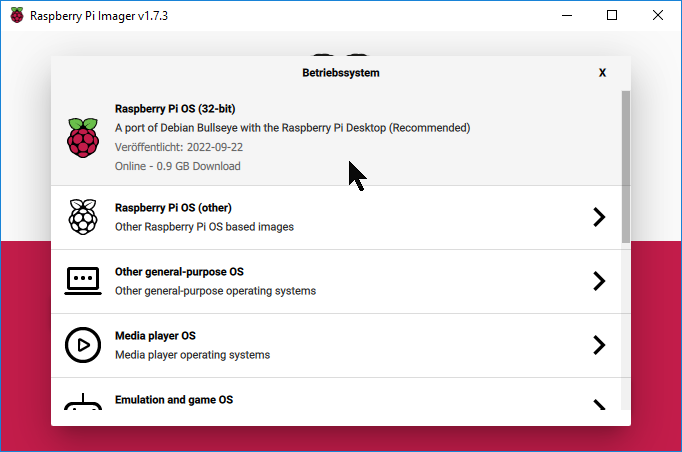 |  |
| 2. Select OS: 32 Bit Standard. | 3. Extended Options: Hostname, Wifi, Keyboard |
Naming convention: PicoPluster Number: picX, Node Number: nY ⇒ `picXnY`
 |
| WLan Router, DHCP |
Configure Nodes
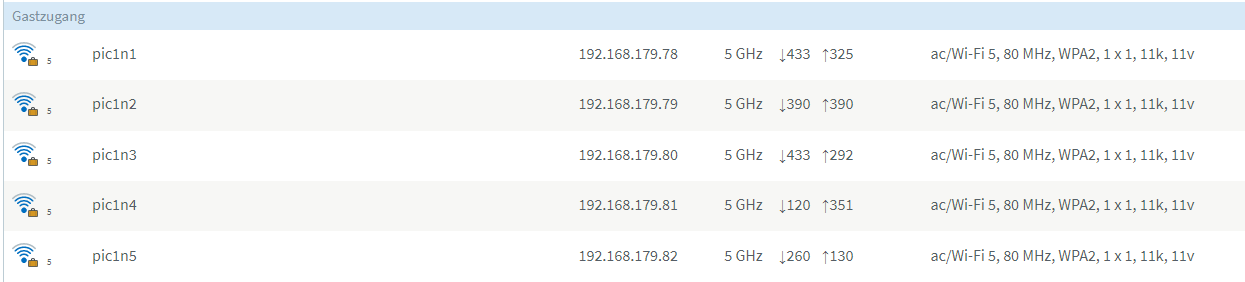
Summary: Hostnames and Network Interfaces
| node | role | hostname (wlan0) | wlan0 dynamic IP (DHCP) | 2nd hostname (eth0, /etc/hosts) | eth0 static IP |
|---|---|---|---|---|---|
| 1 | master | pic1n1 | 192.178.179.78 | pic1n1e0 | 192.168.111.1 |
| 2 | worker | pic1n2 | 192.178.179.79 | pic1n2e0 | 192.168.111.2 |
| 3 | worker | pic1n3 | 192.178.179.80 | pic1n3e0 | 192.168.111.3 |
| 4 | worker | pic1n4 | 192.178.179.81 | pic1n4e0 | 192.168.111.4 |
| 5 | worker | pic1n5 | 192.178.179.82 | pic1n5e0 | 192.168.111.5 |
Some aliases in bash for convenience
Activate some aliases in `~pi/.bashrc`:
# some more ls aliases
alias ll='ls -l'
alias la='ls -A'
alias l='ls -CF'
Local hostnames of eth0 in /etc/hosts
Add additional static hostnames for eth0 to /etc/hosts. This allows to use hostnames without DNS entries.
# /etc/hosts
192.168.111.1   pic1n1e0
192.168.111.2   pic1n2e0
192.168.111.3   pic1n3e0
192.168.111.4   pic1n4e0
192.168.111.5   pic1n5e0
Check the DNS search order in /etc/nsswitch.conf: Option `files` must be before dns to assign /etc/hosts the higher precedence to. Usually default, nothing to do.
# /etc/nsswitch.conf
hosts:          files mdns4_minimal [NOTFOUND=return] dns
eth0 Static IP Addresses
Static IP for eth0 is set in /etc/dhcpcd.conf (not under /etc/network/interfaces !). In my test setup at home the default route should be via wlan0. The config is sent via DHCP by the wifi home router. Otherwise the raspi does not connect to any other network but the local 192.168.111.0/24 or eth0. Up to now the PicoCluster switch is not connected via ethernet to the home router.
Change the static IP address in the following config for each node!
# /etc/dhcpcd.conf
#rb: picXnY config, 2022-11-19
# Default route via wifi, set by dhcp of guest wifi router
interface eth0
static ip_address=192.168.111.[1|2|3|4|5]/24
#static routers=NOT USED.DEFAULT ROUTE THROUGH WIFI
#static domain_name_servers=NOT USED.DEFAULT ROUTE THROUGH WIFI
Some commands to check the network configuration:
ip r

netstat -nr

hostname -I # get own IP addresses

route -n

nmap -sn 192.168.111.0/24
Ansible for Multi-Node Installation and Configuration
Install Ansible Software on all Nodes
Ansible is executing commands via ssh on other nodes.
Some infos:
sudo apt update
sudo apt upgrade -y
sudo apt install ansible -y # Installed version: 2.10.7 (2022-11-20)
# I am confused. The directory ''/etc/ansible'' is not created. Is this still in use?


# tutorial of 2018: Does not work this way anymore
# sudo apt install software-properties-common
# sudo apt-add-repository -y ppa:ansible/ansible
# Error: could not find a distribution template for Raspbian/bullseye
# sudo apt-get update
# sudo apt-get install -y ansible
Establish ssh Login without Password (exchange public key)
Generate ssh keys on the master node and add the public key to the authorized_keys file in the user's ssh folder on the worker nodes.
Attention!
If the following error occurs:
scp: /home/pi/.ssh/authorized_keys: No such file or directory
it means that the ssh directory on the target side does not exist, yet. The easiest way to create it is maybe to log in to the worker node via ssh and to start a ssh connection from the worker node to any target, e.g. the master node.
ssh-keygen

scp ~pi/.ssh/id_rsa.pub pic1n2e0:~pi/.ssh/authorized_keys
scp ~pi/.ssh/id_rsa.pub pic1n3e0:~pi/.ssh/authorized_keys
scp ~pi/.ssh/id_rsa.pub pic1n4e0:~pi/.ssh/authorized_keys
scp ~pi/.ssh/id_rsa.pub pic1n5e0:~pi/.ssh/authorized_keys
Ansible Configuration, ansible.cfg
Ansible >= 2.12:
Example config file can be generated by ansible-config init –disabled > ansible.cfg.
Read https://github.com/ansible/ansible/blob/stable-2.12/examples/ansible.cfg
Ansible < 2.12, e.g. 2.10:
Download example config files from https://github.com/ansible/ansible/tree/stable-2.10/examples
K3S Ansible for Raspberry Pi Cluster
Info Source 1
| Jeff Geerling |
 K3s Ansible Git Repository: https://github.com/k3s-io/k3s-ansible
This is what I am using, with a few adaptations (names, IP adresses, etc.)
Info Source 2: Alex Ortner, Medium: How to build a Raspberry Pi Kubernetes Cluster with k3s
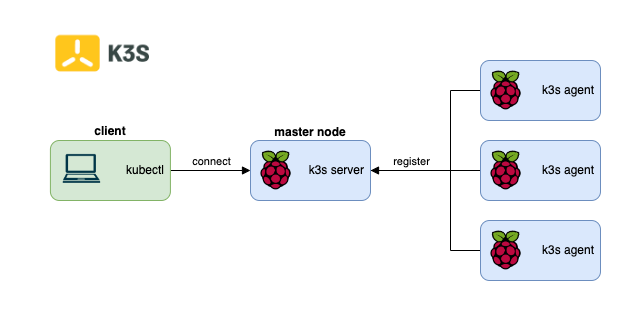 |
The figure above gives a rough overview of the planned architecture.
Modification: I decided to install client and master in parallel on one Raspberry Pi (the mater node)!
Info Source 3: Cyprien Lecallier, Padok: K3S with Raspberry Pi: configuration, connection and installation
Info Source 4: Installieren und konfigurieren von kubectl
Info Source 5: Lee Carpenter (opensource.com): Run Kubernetes on a Raspberry Pi with k3s
Install kubectl on the Raspberry Pi Client
There are at least 3 different ways to install kubectl on Linux:
- Install kubectl binary with curl on Linux
- Install using native package management
- Install using other package management (e.g. Snap Store)
The following webpage on kubernetes.io explains the three options in detail:
https://kubernetes.io/docs/tasks/tools/install-kubectl-linux/
I decided to use Snap Store as described on the snapcraft.io webpage Install kubectl on Raspberry Pi using the Snap Store:
https://snapcraft.io/install/kubectl/raspbian
Some kubectl Tests
https://www.tecmint.com/deploy-nginx-on-a-kubernetes-cluster/
sudo kubectl get nodes

sudo kubectl get pods --all-namespaces

sudo kubectl get pods -A

sudo kubectl run nginx-sample --image=nginx --port=80

sudo kubectl get pods -A

#sudo kubectl expose deployment/nginx-sample --type="NodePort" --port 80

#sudo kubectl expose nginx-sample --type="NodePort" --port 80

kubectl delete pod nginx-sample  --now

sudo kubectl get pods -A
Result: RUNNING!
I can deploy first examples. Now I would need to learn more about kubectl.
Summary / Outlook
- The most important info for me was the K3s Ansible project described above together with the matching video by Jeff Geerling.
Both resources are referred to as “Info Source 1” above.
Improvements
What I would improve in the next development cycle:
- Separate the client node from the K3s master node:
- 1x “client” node: OS with GUI, Ansible master, kubectl
- 1x K3s master node: minimal OS, no GUI
- 3x K3s worker nodes: minimal OS, no GUI