Table of Contents
Day 2: Sensors and Communication
Welcome to day two of our IoT workshop series! Today we will read a value from a soil moisture sensor, see it in the Serial Monitor, connect our board to WiFi, and finally send a message to an MQTT broker.
We are using the Arduino framework inside PlatformIO throughout this workshop.
1. How a Capacitive Soil Moisture Sensor Works
A capacitive soil moisture sensor measures how much water is in the soil by detecting changes in capacitance around its probe. Water and dry soil store electrical charge differently, so as the soil gets wetter, the capacitance the sensor measures changes. The sensor turns this into an analog voltage: drier soil and wetter soil produce different voltage levels, which our ESP32 can read.
Unlike older resistive sensors, the capacitive type has no exposed metal electrodes touching the soil. This means it does not corrode nearly as quickly, making it much better suited for long-term use.
We are using the DFRobot Analog Capacitive Soil Moisture Sensor.
2. Connecting the Sensor to the DOIT ESP32
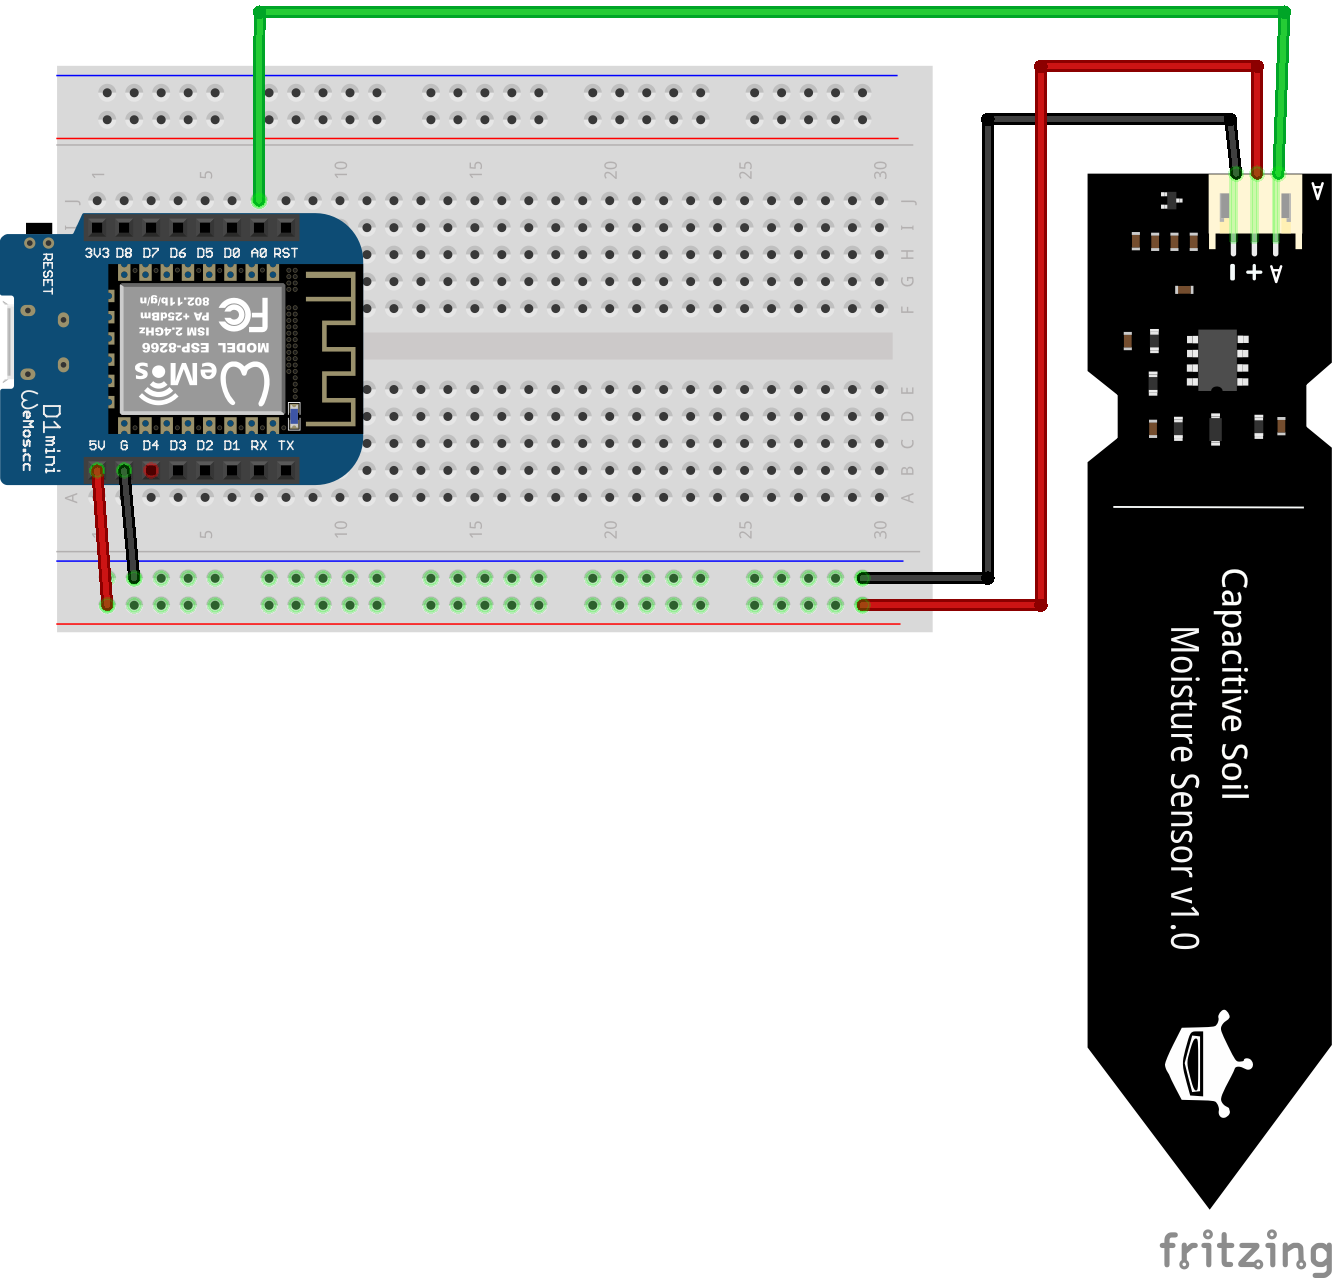
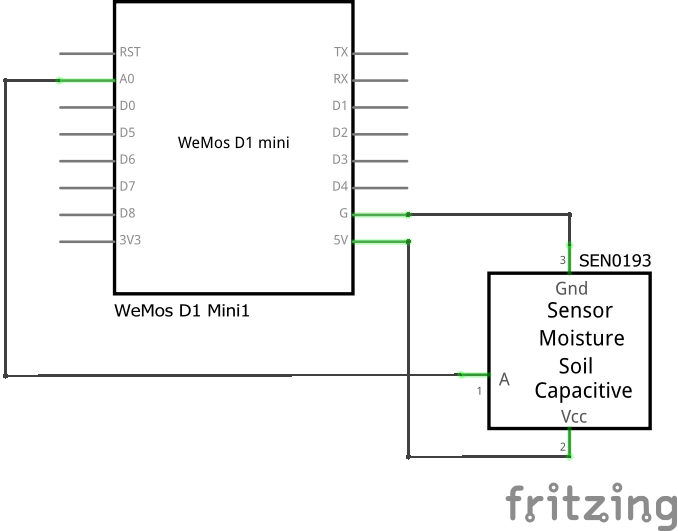
The sensor has three wires:
| Sensor Pin | Connects to ESP32 | Purpose |
|---|---|---|
| VCC (red) | VIN (5V) or 3V3 | Power |
| GND (black) | GND | Ground |
| AOUT (blue) | An analog-capable GPIO (e.g. GPIO34) | Analog signal out |
A few notes:
- The signal wire goes to an analog input pin. On the DOIT ESP32 DevKit, pins like GPIO34, GPIO35, GPIO32, GPIO33 work well for analog reading.
- The sensor can run on either 3V3 or 5V. The VIN pin on the DOIT ESP32 provides 5V (when the board is powered over USB).
- Important: the ESP32's analog pins can only safely read up to ~3.3V. If you power the sensor from 5V, its output range is higher, so be aware the readings will scale differently — and never feed more than 3.3V into a GPIO pin.
- Double-check GND is shared between the sensor and the board.
Here an example to connect to similiar MCU. Make sure to check the Pinout of your specific board!
3. Reading the Sensor with the Serial Monitor
Before we send data anywhere, we want to see it. The easiest way is the Serial Monitor.
Serial is a way for the ESP32 to send text back to your computer over the
USB cable. By calling Serial.begin() once at startup and then
Serial.println() whenever we have something to show, we can print our
sensor readings to the screen in real time. This is incredibly useful for
checking that everything is wired correctly and that the numbers change when
you touch the sensor or place it in soil.
Open the Serial Monitor in PlatformIO and make sure the baud rate matches
the value you set in Serial.begin() (commonly 115200).
// PLACEHOLDER — Sensor reading code
// This should:
//   - start Serial at the chosen baud rate in setup()
//   - read the analog value from the sensor pin
//   - print the value to the Serial Monitor in loop()
//   - add a short delay so the output is readable
Once uploaded, you should see numbers scrolling in the Serial Monitor. Try touching the sensor or dipping it into soil/water — the value should change.
4. Connecting to WiFi
Now that the board works on its own, let's get it online. The ESP32 has built-in WiFi, so we just need to give it the network name (SSID) and password of our workshop access point.
In setup() we tell the ESP32 to connect, then wait in a short loop until
the connection succeeds. We can print the status to Serial so we know when
we're online.
// PLACEHOLDER — WiFi connection code
// This should:
//   - include the WiFi library
//   - store the SSID and password
//   - start the connection in setup()
//   - wait until connected, printing progress to Serial
//   - print the assigned IP address once connected
When it works, the Serial Monitor will show that the ESP32 has joined the network and received an IP address.
5. Introducing MQTT
MQTT is a lightweight messaging protocol that is very popular in IoT. The idea is simple: devices send (“publish”) messages to a central server (the “broker”), and other devices can listen (“subscribe”) for them. Today we will only publish — sending messages out. We will not subscribe.
6. Publishing a Message to the Broker
For our final step, we connect to the MQTT broker and send a single
message of your choosing — any text string you like, for example
“hello from my esp32”.
- This is not the soil moisture value. That's a separate exercise. Here we are just proving we can talk to the broker by sending a simple string.
- We connect to the broker, then publish our chosen string to a topic.
// PLACEHOLDER — MQTT publish code
// This should:
//   - include the MQTT client library
//   - set the broker address and port
//   - connect to the broker in setup() (after WiFi is connected)
//   - publish a single text string of your choosing to a topic
//   - print confirmation to Serial
Pick any message you want and send it. 🎉
Recap
By the end of today you have:
- Learned how a capacitive soil moisture sensor works
- Wired it to the DOIT ESP32
- Read its value in the Serial Monitor
- Connected the ESP32 to WiFi
- Learned the basics of MQTT
- Published your own message to the MQTT broker