User Tools

Site Tools


amc2020:group_n:test

This is an old revision of the document!


Test Page

Image Map

Disadvantage: when the image is rescaled, the image map is not. So the hot spots with the links are not where they are supposed to be.
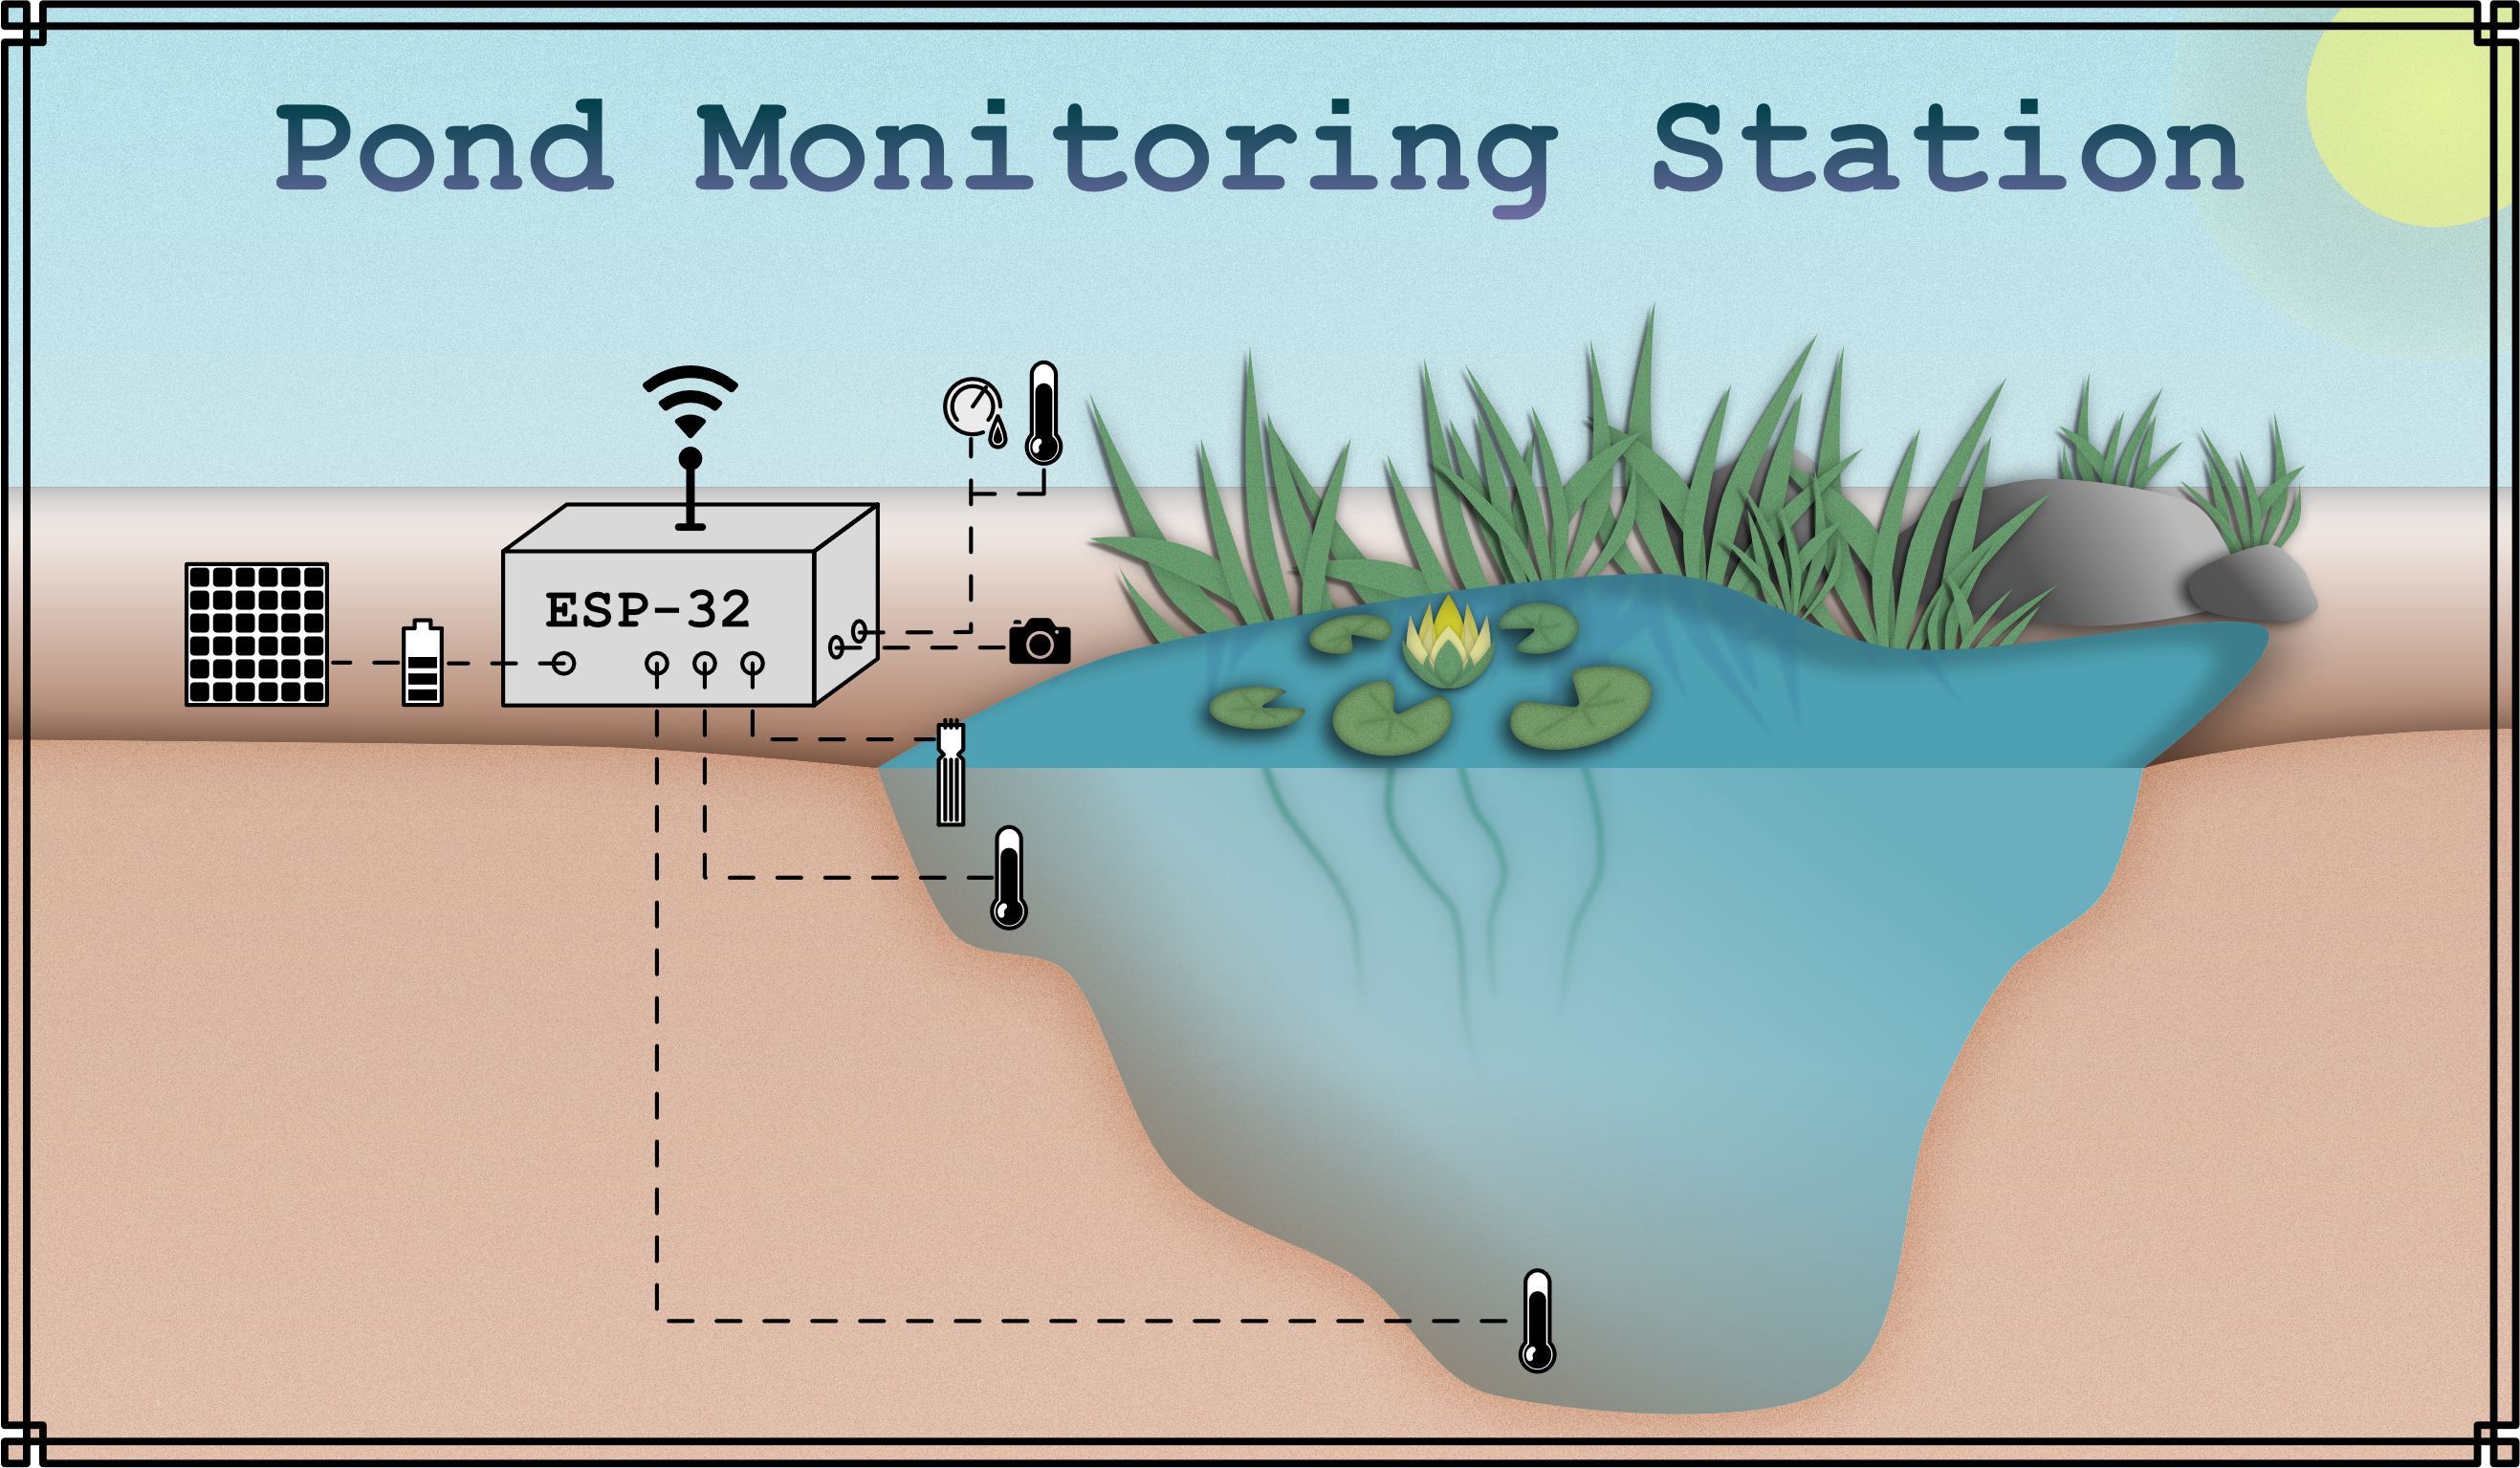
DHT-22 DS18B20 DS18B20 ESP32 PV and Battery Level ESP32CAM Pond

Relative Positions (for smartphones etc.)

Advantage: position of the hot spots scales with the size of the image displayed.

Lists

Testing Lists with HTML

As mentioned before, the data that is transmitted consists of 40 bits. 2 bytes for the relative humidity, 2 bytes for the temperature and 1 byte (check-sum) to check for finding errors in the transmission. The principle becomes clearer when looking at an example transmission:
\[\mathrm{0000\; 0010\; 1000\; 1100\;\; 0000\; 0001\; 0101\; 1111\;\; 1110\; 1110}\] \[\mathrm{\;\;\;\;\;\;\;\;\; Humidity \;\;\;\;\;\;\;\;\;|\;\;\;\;\;Temperature \;\;\;\;\;\;\;|\; check-sum}\]

  1. The first two bytes contain the relative humidity data, converted to decimal, that gives:
    \[\mathrm{0000\; 0010\;\; 1000\; 1100_{2}} → 652_{10}\] To obtain the relative humidity RH in percent, the value must be divided by 10:
    \[RH = \frac{\mathrm{652}}{\mathrm{10}} = \mathrm{65.2\;\%}\]
  2. For the temperature it works in a similar way. The binary gets converted to decimal and is divided by 10 to obtain the temperature in °C:
    \[\mathrm{0000\; 0001\;\; 0101\; 1111_2 → 351_{10}}\] \[T = \mathrm{\frac{351}{10} = 35.1 °C}\] Unlike relative humidity, the temperature can be below 0 (negative). If that is the case, the first digit of the first temperature byte (byte 3) is a 1.

  3. The last byte contains the 8 least significant bits (LSB) of the sum of both humidity and both temperature bytes:
    \[\mathrm{0000\; 0010 + 1000\; 1100 + 0000\; 0001 + 0101\; 1111 = 1110\; 1110}\] After receiving the data, if the last byte (check-sum) is different from the 8 LSBs of the sum of the other 4 bytes, there was an error in the transmission. The MCU can thus check if the data was transmitted correctly.

Changing Fonts and Colours in the text

The function Serial.begin() starts the serial connection.

Arduino IDE style Fonts for functions etc:

Reoccurring Functions, Templates

<html><HTMLElement</html>
<span>InlineText</span>
<b>bold</b>
<font face="Courier New">TextInCourierNew</font>
<font style="color:#CD5307">TextInOrange</font>

Black:
<b><font face="Courier New">TextInBlack</font></b>

Orange:
<b><font face="Courier New"><font style="color:#CD5307">TextInOrange</font></font></b>

Blue:
<b><font face="Courier New"><font style="color:#0098A3">TextInBlue</font></font></b>

Green:
<b><font face="Courier New"><font style="color:#5A6B0F">TextInGreen</font></font></b>


Hexadecimal Color Codes: 
Orange (Objects, functions): #CD5307
Blue (Variables): #0098A3
Green (preprocessor commands): #5A6B0F

Basic: Text

Methods

Class.method()
Class.method()
Class.method()

Loops and control structures
for()
if()
setup()
loop()

Variables

const int
String
long
unsigned int
uint8_t

Preprocessor Commands

#include
#define

Functions

delay()
printAddress()

Back To Start of the Page

Test

Lorem ipsum dolor sit amet, consetetur sadipscing elitr, sed diam nonumy eirmod tempor invidunt ut labore et dolore magna aliquyam erat, sed diam voluptua. At vero eos et accusam et justo duo dolores et ea rebum. Stet clita kasd gubergren, no sea takimata sanctus est Lorem ipsum dolor sit amet. Lorem ipsum dolor sit amet, consetetur sadipscing elitr, sed diam nonumy eirmod tempor invidunt ut labore et dolore magna aliquyam erat, sed diam voluptua. At vero eos et accusam et justo duo dolores et ea rebum. Stet clita kasd gubergren, no sea takimata sanctus est Lorem ipsum dolor sit amet.Lorem ipsum dolor sit amet, consetetur sadipscing elitr, sed diam nonumy eirmod tempor invidunt ut labore et dolore magna aliquyam erat, sed diam voluptua. At vero eos et accusam et justo duo dolores et ea rebum. Stet clita kasd gubergren, no sea takimata sanctus est Lorem ipsum dolor sit amet. Lorem ipsum dolor sit amet, consetetur sadipscing elitr, sed diam nonumy eirmod tempor invidunt ut labore et dolore magna aliquyam erat, sed diam voluptua. At vero eos et accusam et justo duo dolores et ea rebum. Stet clita kasd gubergren, no sea takimata sanctus est Lorem ipsum dolor sit amet.Lorem ipsum dolor sit amet, consetetur sadipscing elitr, sed diam nonumy eirmod tempor invidunt ut labore et dolore magna aliquyam erat, sed diam voluptua. At vero eos et accusam et justo duo dolores et ea rebum. Stet clita kasd gubergren, no sea takimata sanctus est Lorem ipsum dolor sit amet. Lorem ipsum dolor sit amet, consetetur sadipscing elitr, sed diam nonumy eirmod tempor invidunt ut labore et dolore magna aliquyam erat, sed diam voluptua. At vero eos et accusam et justo duo dolores et ea rebum. Stet clita kasd gubergren, no sea takimata sanctus est Lorem ipsum dolor sit amet.

Go here!

DS3231 Code Explanation

  1. As explained before, no external library needs to be included, only the Wire.h library for I2C communication for reading and writing to the registers of the DS3231.
  2. The I2C address of the DS3231 needs to be defined. By default (if no solder connections are used) it is hexadecimal 0x68.
  3. When setting the day of the week later, 1 represents Monday, and 7 represents Sunday. To make it more intuitive the days are here defined.

  4. As explained in section 2, the alarm register mask bits define the alarm rate. For example, choosing the ALARM_SECONDS_MINUTES_MATCH option would trigger an alarm once every hour - when the seconds and the minutes in the alarm and the time register match.
  5. The byte array Alarm1MaskBits[6] is basically an array containing table 2 with the mask bits for the alarm rates, where each array element represents a row from the table. The MSB in each element represents the bit for selecting either day or date format. Bit 6 is for A1M4, bit 5 is A1M3, and so on. The three LSBs are not needed and are just set to 0. Later on, using the previously defined (4) alarm 1 settings, one element is chosen from the array to set the alarm rate accordingly.

  6. Here the Arduino pins for the interrupt (IntPin) and for the LED (LEDPin) are chosen. The interrupt pin has to be eitehr pin 2 or 3 for the UNO. the boolean variable ledstatus is just used in the main loop to switch the LED on and off.
  7. When an interrupt is triggered, the MCU executes the attached interrupt service routine ISR which is defined later. The variable Count is used to count the number of interrupts triggered and is incremented by 1 in the ISR. Variables that are changed inside an ISR need to be configured as volatile.
    Configuring a variable as volatile tells the Compiler to load the variable from the RAM instead of the a storage register. This is necessary when the variable can be changed from somewhere else than the code that it is appearing in, for example a concurrently executed function like an ISR.

  8. In the setup(), the method Wire.begin() starts the I2C bus connecting DS3231 and Arduino UNO.
  9. The interrupt pin IntPin needs to be configured as an input. Furthermore, the DS3231's SQW pin (which is activated when an alarm is triggered) is an open drain output, which means it shorts the pin to GND when active. The Arduino interrupt pin (pin 2) needs to be HIGH normally, so that the voltage drop triggered by the SQW pin can be detected. As the Arduino has internal pullup resistors, activating them using INPUT_PULLUP is sufficient for this.
  10. The pin for the LED needs to be configured as an OUTPUT to switch the LED on and off.
  11. Here the later defined function setRTCTime is called to configure the time, date and day of the week of the DS3231. As an argument it needs the seconds, minutes, hours, day of the week, day of the month, month and year. After the time is configured for the first time, this should be commented out to prevent the time from being reset every time the Arduino restarts.
  12. The function setRTCAlarm1 configures the seconds, minutes, hours, date or day of the week, as well as the setting for the alarm rate for alarm 1 by writing to the alarm registers. Furthermore it activates alarm 1 and enables interrupts in the status register. The function is defined later on. If the alarm is already configured and working, this line of code can be commented out as well.
  13. To attach an interrupt on the Arduino UNO, the function attachInterrupt() is used. As first argument the function digitalPinToInterrupt() is given and as its argument the Arduino interrupt pin (2) is submitted. Afterwards, the function expects the name of the interrupt service routine which is called whenever an interrupt is triggered; in this sketch it is called ISRLED. The last argument is the interrupt mode. There are 5 (for the UNO 4) different modes. Here the mode FALLING is necessary which indicates that the interrupt is triggered whenever the interrupt pin goes from HIGH to LOW.

  14. The main loop() loop itself is very short. Firstly, by removing the alarm 1 flag in the DS3231 status register with the function clearAlarm1() defined below, alarm 1 is reset. In the final application this will only be done once after the MCU wakes up from deep sleep.
  15. The if control structure checks the variable Count. In this example, the alarm was chosen to go off every second (12), so the Count variable is incremented by 1 once a second, so the condition becomes true after 1 second. It then resets the counter variable and changes the status of the LED. So in conclusion, it switches the LED on and off in 1 second intervals. The intervals can be changed by adjusting the condition. This is just used as an indicator to check if the interrupt is working as supposed to.

  16. The function decToBCD() returns and expects as an arguement a byte type value. It is used to convert a decimal number DEC to a binary coded decimal number BCD. As explained before, the time and alarm registers of the DS3231 are written in BCD format. However, DEC format is much more intuitive for the user to set the alarm and time of the module. Therefore, this function is used to convert the decimals given as function arguments for the two functions called in the setup (11 & 12) to the format that the DS3231 understands.
  17. This function does the exact opposite of the previous one. It converts binary coded decimal back to decimal. This is only used for optionally checking if the time set in the DS3231 is correct.

  18. The function ISRLED() is serving as the interrupt service routine called when an interrupt is triggered. Here it is used only to increment the counter variable and active the flag for the interrupt status. There are a few things to consider when writing an interrupt service routine. ISRs should always be as as short as possible because when they are called, the normal program stops as long as they are running; so functions that need a lot of time like print functions should be avoided. Furthermore,delay(), millis()() or micros() are not working inside an ISR and variables used in an ISR need to be volatile. More information can be found on the Arduino Reference page.

  19. As explained before (11), setRTCTime() is used to configure the time registers of the DS3231.
  20. The method Wire.beginTransmission() starts a transmission on the I2C bus in the slave receiver mode. As a function argument, the already defined I2C address (2) is given. Only the slave with that exact address will respond to the now following communication.
  21. The method Wire.write() transmits the byte given as an argument. The first write() sets the register pointer of the DS3231. Here the pointer is set to 0x00, which means that the following input is stored in the register with the address 0x00 which is the time register for the seconds.
  22. Now the value for Second given as function argument is converted into BCD format and is then sent on the I2C bus to the DS3231 which overwrites the 0x00 register with the new information. That means the seconds of the DS3231 are configured. The register pointer then automatically jumps to the next register which is storing the minutes. As all the time registers are grouped together, all of them can be configured in one transmission, one after the other.
  23. When all the registers are configured and the DS3231 has a new time set, the I2C transmission is stopped with Wire.endTransmission().

  24. Here follows the definition of function setRTCAlarm1() which was used in the setup() (12).
  25. To configure the four registers of alarm 1, it is necessary to convert the seconds, minutes, hours and date/day into BCD format again. However, as can be seen in table 1, the alarm registers also contain the mask bits for the alarm rate which are stored as A1M1 to A1M4 in the MSBs of the four. The Which mask bit is used for which register is determined by the element chosen in the mask bit array (5).
    The function bitRead() is used to read a single bit from a byte. The first argument is the byte to read from; here the Alarm1MaskBits[] array is used and the byte element to read is determined by the Setting (4). ALARM_ONCE_PER_SECOND thus means the first element from the array which is B01111000, is chosen to read from. The second argument is the number of the bit, where 0 is the LSB and 7 is the MSB. The bit mask for the seconds register is the 4th bit from the right, so bit number 3. To now place that bit correctly in the Second byte, it mus be written inthe A1M1 bit (MSB). The MSB has a decimal value of 128, so the mask bit is just multiplied by 128 which puts it to the front.
    This same process is repeated for the minutes hours and days. What changes is the position of the respective mask bit in the mask bit array element; for minutes it is 4, for hours 5 and for days or date 6.
    The hour format will automatically be 24 hours like in the time register because bit 6 stays always 0 (see table 1). However, when the alarm rate is chosen to be either once a week or once a month, i.e. days/date are matched, that has to be changed in the code. Therefore, the MSB of the array element contains a 0 for matching the date and a 1 for matching the day (table 2). This value is read from the array with another bitRead() and the retrieved value is multiplied with 64 to put it to bit 6 of the DayDate byte.
  26. After configuring the values of the bytes for setting the alarm, another transmission to the RTC is started and the register pointer is set to register 0x07 containing the alarm settings for the seconds. Then the before calculated bytes are transmitted one after another to configure the alarm. and the transmission is ended.
  27. To activate alarm 1 and enable the interrupt output throug the SQW pin, another transmission is started and the register pointer is set to 0x0E which is the DS3231's control register.
  28. Then the byte B00011101 is transmitted through I2C to configure the control register. What it does can be found in detail in the datasheet on page 13. In short, what each bit does is: B: 0 - turn on the oscillator; 0 - no square wave output; 0 - no temperature conversion command; 1 - square wave frequency setting - 1 square wave frequency setting; 1 -activate interrupt output; 0 - deactivate alarm 2; 1 - activate alarm 1.
    After that, the alarm is set and an interrupt is issued when the respective register entries match.

  29. Whenever the alarm is activated, the alarm flag bit in the DS3231 status register is switched to a 1 and needs to be reset manually by changing the bit back to a 0. The function clearAlarm1() does exactly that. It starts a transmission, sets the register pointer to the status register and resets the value. More information can be found in the datasheet on page 14.

  30. The last two functions are not used in the sketch but are useful to check whether the DS3231 has a correctly configured time register. The function readRTCTime() reads the values from the register and the function displayTimeSerial() prints it to the serial monitor. In the functions pointers are used to be able to only use local instead of global variables. The local variables Second, Minute, Hour and so on are declared locally in the displayTimeSerial() function. Then their addresses are given as function argument to the readRTCTime() which gives those addresses to its own locally declared pointer variables of the same name. The pointer variables are indicated by the asterisk * next to the variable name.
  31. Then the I2C transmission is started in slave receiver mode to set the register pointer to the seconds register and the transmission is ended again.
  32. Another transmission is started but in the slave transmitter mode using the Wire.requestFrom() method. It needs the I2C address of the slave and the number of bytes which are requested.
  33. The dereferencing operator, the asterisk *, is used to change the value at the address of the pointer variable, in this case the value for the local variables from the displayTimeSerial() function. As a value they get the time stored in the DS3231 time registers converted back to decimal.

  34. In the displayTimeSerial() function, the local variables are created, their addresses are given to the readRTCTime() function using the referencing operator & and then their results are printed to the serial monitor

amc2020/group_n/test.1596014745.txt.gz · Last modified: 2021/08/24 17:34 (external edit)