Table of Contents
ESP32 Connection to WiFi and MQTT
1. About MQTT
MQTT stands for Message Queuing Telemetry Transport and is a publish-subscribe network protocol for transporting messages between different devices. It was first developed in 1999 and is very popular for IoT (Internet of Things) applications.
The core of an MQTT network is a server also called MQTT broker. Other devices, called clients, can connect through WiFi to the broker and publish or subscribe to certain topics. The broker receives the messages that are published by the clients and sorts them by their topics. Clients can also subscribe to topics; if a new message is published under a certain topic, the broker redirects this message to all clients that are subscribed to that topic.
An example for how to apply this would be to read certain sensor data with a microcontroller and publish it for example under the topics:
- ESP32/Temperature/Air
- ESP32/Temperature/Water/Surface
- ESP32/Temperature/Water/Bottom
- ESP32/Humidity/Air
Another client could subscribe to these topics and would receive any messages published in those topics. Clients like node-RED allow to subscribe to topics and visualize the data on a website or transfer the results to a database for permanent storage.
It would also be possible to subscribe to a topic with the microcontroller and control for example the lighting in the living room with a smartphone.
2. Setup
For testing MQTT and developing a working program structure, it was not necessary to connect any of the sensors. Instead, 4 example String objects were used which would be of the same format as the results from the sensor measurements. Furthermore, in the final application, the values are to be sent to the eolab server were they are printed and stored using a combination of node-RED, which is an MQTT client, the influxdb database for data storage, and grafana for printing the data. However, for the program code on the ESP32 it is only a minor difference to which server the data is sent. Therefore, for testing, the example data were only published to a local mosquitto server (Eclipse Mosquitto), acting as MQTT broker, and printed using MQTT.fx (MQTT.fx) as MQTT client. Both programs are free to use and are easy to set up and therefore perfectly suited for testing.
The goal was to wake the ESP32 up from deep sleep by using the DS3231 interrupt signal (once a minute for testing). Then reset the alarm, start the WiFi connection and connect to the mqtt broker and, if successful, publish the example data to four different topics and go back into deep sleep. Therefore, the ESP32 needs to be connected to the DS3231 as shown in the ESP32 Deep Sleep Mode-page.
It could be possible due to issues either with the local WiFi, the MQTT broker (e.g. the eolab or the mosquitto server), or the ESP32 itself, that connection to WiFi or MQTT broker might not be possible. To prevent the ESP32 from getting stuck in an endless loop trying to connect to either of the two, a timeout is included in the code. The ESP32 will try to connect to both for 30 seconds maximum each. If no connection is possible, it will increment a counter, write it to its nonvolatile flash memory, restart, and try again to connect. If after three tries, still no connection is possible, it resets the counter and goes back into deep sleep to try again when the next interrupt from the DS3231 occurs. This way, the ESP32 only measures sensor data if a connection could be established and if not, it tries a few times to reconnect and then goes back to deep sleep such that the batteries are not drained due to the ESP32 being stuck in an endless loop.
The ESP32 can be restarted manually by pressing the EN (Enable) button on the board. But there is also an EN pin which can be used for the same thing. The EN pin is connected to the voltage regulator on the board and is normally pulled to high voltage through an internal pullup resistor. If the voltage on the EN pin is low, the ESP32 is powered down and restarts as soon as the voltage level is high again. The button on the board shorts the EN input pin to GND and therefore restarts the board. To be able to restart the ESP32 automatically through software, a transistor is needed that shorts the EN pin to GND when a high voltage signal is applied to the base of the transistor.
Transistors
A transistor is a semiconductor device which basically consists of two diodes connected back to back such that one is always forward-biased and one is always reverse-biased blocking the current from collector to emitter side of the transistor. In an NPN transistor, the base is connected to the positively doped section in the middle. The emitter is connected to GND, while the collector is connected to a voltage source. When a voltage is applied to the base of the transistor, a small current flows from the base to the emitter; that means electrons are going from the emitter side to the base. However, as the p layer is very thin, only a small portion of the electrons goes into the base pin, the rest moves forward through the pn junction between base and emitter layers which makes it conducting. A small base current thus allows for a large collector current. The transistor can thus be used as a current amplifier or as a switch.
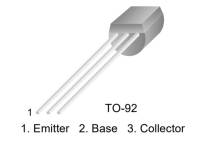
 | Figure 1 PN2222 transistor (Source: PN2222 Datasheet p. 2) |
|---|
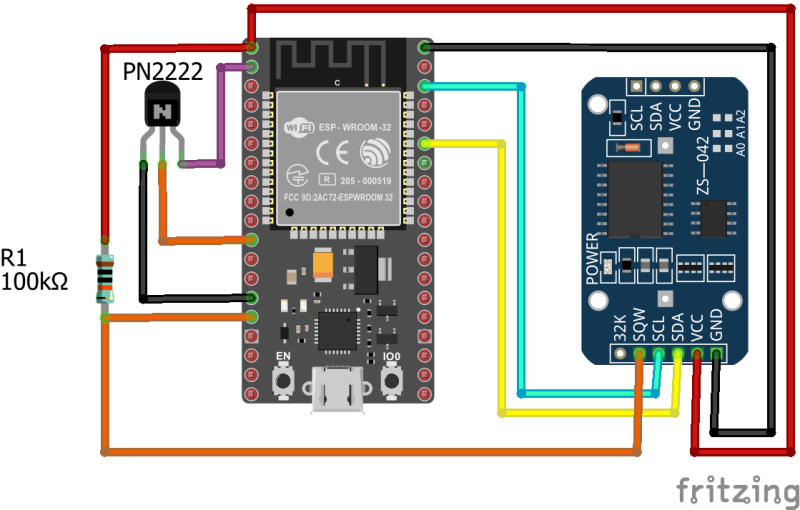
Here, a PN2222 NPN transistor is used to work as a switch to short the EN-pin to GND when the base voltage is high. The emitter (pin 1) is connected to GND, the base (pin 2) to GPIO 27, and the collector (pin 3) is connected to the EN pin. The necessary connection can be seen in figure 2.
3. Programming
The following sketch includes all the features discussed before. The serial print commands are just for understanding of the sketch and to be able to see what is happening in the serial monitor. In the final sketch, the serial print commands can be left out as they would only consume time and energy during operation.
3.1 Code
- ESP32_MQTT.ino
//ESP32 MQTT + Deep Sleep + Power Reset

//WiFi and MQTT
#include "WiFi.h"                                 //1
#include "PubSubClient.h"

const char* password = "****************";        //2
const char* ssid = "*************";
#define mqtt_broker "192.168.2.103"               //3

WiFiClient espClient;                             //4
PubSubClient mqttClient(espClient);

//Example Values:                                 //5
String val1= "Hello";
String val2= "World";
String val3= "Hey";
String val4= "ESP32";
char Buffer[5];

//Deep Sleep
#include <Wire.h>                                 //6
#define DS3231RTC_I2C_ADDRESS 0x68
#define I2C_SDA 21
#define I2C_SCL 22

//EEPROM
#include <EEPROM.h>                               //7
#define EEPROM_BYTES 2
#define WIFIRESETADDRESS 0
#define MQTTRESETADDRESS 1

//Restart
#define RestartPin 27                             //8

void setup(){
  Wire.begin(I2C_SDA, I2C_SCL);                   //9
  clearAlarm1();
  EEPROM.begin(EEPROM_BYTES);                     //10
  Serial.begin(115200);
  esp_sleep_enable_ext0_wakeup(GPIO_NUM_13,0);
  WiFiConnect();                                  //11
  MQTTConnect();
  Serial.println("Transmitting data.");
  val1.toCharArray(Buffer, 6);                    //12
  mqttClient.publish("ESP32/Test1", Buffer);      //13
  delay(500);                                     //14
  val2.toCharArray(Buffer, 6);
  mqttClient.publish("ESP32/Test2", Buffer);
  delay(500);
  val3.toCharArray(Buffer, 4);
  mqttClient.publish("ESP32/Test3", Buffer);
  delay(500);
  val4.toCharArray(Buffer, 6);
  mqttClient.publish("ESP32/Test4", Buffer);
  Serial.println("Going into sleep mode");
  esp_deep_sleep_start();                         //15
}

void loop(){
  //Main loop is not going to be called.
}

void clearAlarm1(){
  Wire.beginTransmission(DS3231RTC_I2C_ADDRESS);
  Wire.write(0x0F);
  Wire.write(B00000000);
  Wire.endTransmission();
}

void WiFiConnect(){                                 //16
  byte WiFiResets = EEPROM.read(WIFIRESETADDRESS);  //17
  unsigned long Timer = millis()+1000;              //18
  Serial.print("Connecting with WiFi");
  WiFi.begin(ssid, password);                       //19
  unsigned long Timeout = millis()+30000;           //20
  while(WiFi.status() !=WL_CONNECTED){              //21

    if(millis()>Timer){                             //22
      Timer= millis()+1000;
      Serial.print(".");
    }

    if(millis()>Timeout){                           //23
      if(WiFiResets ==2){                           //24
        EEPROM.write(WIFIRESETADDRESS, 0);
        EEPROM.commit();
        Serial.println();
        Serial.println("Could not connect to MQTT Broker 3 times. Going into deep sleep.");
        esp_deep_sleep_start();
      }
      else{                                         //25
        WiFiResets++;
        EEPROM.write(WIFIRESETADDRESS, WiFiResets);
        EEPROM.commit();
        Serial.println();
        Serial.println("Could not connect to MQTT Broker. Restarting MCU.");
        digitalWrite(RestartPin, HIGH);
      }
    }
  }
  EEPROM.write(WIFIRESETADDRESS, 0);                //26
  EEPROM.commit();
  Serial.println();
  Serial.println("Successfully connected to WiFi");
}

void MQTTConnect(){                                 //27
  byte MQTTResets = EEPROM.read(MQTTRESETADDRESS);
  unsigned long Timer = millis()+1000;
  Serial.print("Connecting with MQTT Broker");
  mqttClient.setServer(mqtt_broker, 1883);          //28
  mqttClient.connect("ESP32Client");                //29
  unsigned long Timeout = millis()+30000;
  while(!mqttClient.connected()){                   //30

    if(millis()>Timer){
      Timer= millis()+1000;
      Serial.print(".");
      mqttClient.connect("ESP32Client");
    }

    if(millis()>Timeout){
      if(MQTTResets ==2){
        EEPROM.write(MQTTRESETADDRESS, 0);
        EEPROM.commit();
        Serial.println();
        Serial.println("Could not connect to MQTT Broker 3 times. Going into deep sleep.");
        esp_deep_sleep_start();
      }
      else{
        MQTTResets++;
        EEPROM.write(MQTTRESETADDRESS, MQTTResets);
        EEPROM.commit();
        Serial.println();
        Serial.println("Could not connect to MQTT Broker. Restarting MCU.");
        digitalWrite(RestartPin, HIGH);
      }
    }
  }
  EEPROM.write(MQTTRESETADDRESS, 0);
  EEPROM.commit();
  Serial.println();
  Serial.println("Successfully connected to MQTT Broker");
}
3.3 The Code Explained
- For connecting the ESP32 with the MQTT Broker, the WiFi.h library and the PubSubClient.h library need to be included. Both libraries should already be installed when the ESP32 boards manager is installed.
- The password and the SSID of the local WiFi network that the ESP32 connects to are defined here. The asterisks need to be replaced by the actual SSID/password for the sketch to work.
- mqtt_broker defines the IP address of the MQTT broker. Here the standard IP for the local mosquitto server is used.
- Then the an object of the WiFiClient class is created allowing the ESP32 to connect to a defined IP and port. The object is not used explicitly in the sketch, but the MQTT library (PubSubClient.h) is using it in the background. Therefore the previously defined object is given as input to the constructor for the object mqttClient of the PubSubClient class.
- The String objects are just placeholders for the strings from the sensor functions containing the measurement values. The working principle is the same. The char[] array is used for transmitting the data with MQTT and has a length of 5. Later on, also a length of 5 is needed: 2 for the temperature/humidity readings in °C, 1 for the point separating integers and decimal places, and 2 for the decimal places of the measurments.
- The necessary definitions and libraries (ESP32 Deep Sleep) for deep sleep must also be included in the sketch.
- As mentioned before, the ESP32 counts the number of times it has reset due to connection issues and goes into sleep mode after 3 unsuccessful tries. Therefore, the counter needs to be stored in a nonvolatile memory; nonvoltaile means the data does not need power supply to be kept, i.e. the ESP32 can be powered off and the data is still there. The ESP32 has a flash memory which can be accessed using the EEPROM.h library (already installed by default). The definition EEPROM_BYTES defines the number of bytes that is needed from the flash memory. As only two counters, one for WiFi and one for MQTT tries, need to be stored, 2 bytes are sufficient. WIFIRESETADDRESS and MQTTRESETADDRESS define the addresses in the flash for storing the counters. The WiFi counter is stored at address 0, and the MQTT counter at address 1.
- The RestartPin is GPIO 27 which is used to control the PN2222 transistor for resetting the ESP32.
- The I2C connection is started first and the DS3231's status register is cleared to reset the alarm.
- The method EEPROM.begin() initiates reading and writing to the flash memory of the ESP32. As an argument it needs the number of bytes used from the flash.
- The functions WiFiConnect() and MQTTConnect() are defined below and establish the connection to the local network and the MQTT broker. If both functions were executed successfully, the sensors are activated and measure temperatures and humidity; this is not shown here because only example "values" are used for the transmission to keep it simpler. Later they will be included. Afterwards the transmission starts.
- val1 is one of the placeholder String objects to be replaced later. The function toCharArray() transfers the string character by character into a char[] array (Buffer). The second argument gives the length of the string to be converted incremented by 1. If the increment is not done, the last character will not be converted. Therefore, it is a huge advantage if the strings of a certain sensor readings are always of the same length.
- The function mqttClient.publish() publishes (transmits) the data to the MQTT Broker previously defined. The first argument is the topic under which the data is to be published. The second argument is the char[] array that is to be transmitted.
- Between each transmission a short delay() is necessary. Otherwise, the ESP32 will only do the first transmission.
- After all 4 values were published to their respective topic, the ESP32 goes into deep sleep mode until another interrupt signal wakes it up again. The main loop is not called in the sketch.
- The function WiFiConnect() is responsible for establishing a WiFi connection and checking whether the attempt was successful or not.
- The local byte type variable WiFiResets is used to store the number of times that the ESP32 was reset in an attempt to establish a WiFi connection. In the beginning it gets assigned the value at the address 0 from the ESP32's flash memory by calling the function EEPROM.read() and giving the address as argument.
- The variable Timer is only used for printing in the serial monitor.
- WiFi.begin() starts the WiFi connection to the network whose SSID and password are given as function argument.
- The variable Timeout is used to check whether the ESP32 has timed out while trying to establish the connection. The function millis() gives back the time since program start in milliseconds. To that value, another 30 seconds (30000 ms) are added; so the time out for the ESP32 is 30 seconds.
- The while() control structure loops until the WiFi connection is established; that means until the function WiFi.status() returns WL_CONNECTED.
- This statement prints a dot every second to the serial monitor so that it can be seen that the ESP32 is currently still working on establishing the connection.
- This statement becomes true as soon as 30 seconds are over by comparing the Timeout variable to the time since program start.
- If a time out occurred, the ESP32 checks the number of previous resets. If this is already the third try, i.e. WiFiResets is equal to 2, the number of tries is reset in the flash memory by calling the EEPROM.write() function and giving the address and the value of the reset counter as argument. The function EEPROM.commit() saves the changes of the flash memory. Then the ESP32 goes into deep sleep. When it is woken up an hour later, it again tries 3 times to connect to the network.
- If it is not yet the third try, the counter variable WiFiResets is incremented by 1 and written to the flash. By writing a HIGH to the RestartPin using digitalWrite(), the ESP32's voltage regulator is stopped for a short moment and the ESP32 resets. If the problem was due to an error by the ESP32 during program execution, restarting might solve the issue such that the measurement routine can be continued and no data points are lost.
- If the connection was established successfully, the reset counter is reset back to 0 in the flash memory and the program continues.
- The MQTTConnect() function works exactly the same way as the WiFiConnect() function, but there are some minor differences.
- To choose the server that is used as MQTT broker, the function mqttClient.setServer() is called. As arguments it needs the IP address and the port of the broker. In this case the standard IP and port for the local mosquitto server are used.
- The function mqttClient.connect() establishes the connection with the broker. If the ESP32 is used, "ESP32Client" is used as argument.
- To check whether the connection was successful, the return value of the function mqttClient.connected() is checked. It gives back a 0 if the connection is not there yet; the bitwise NOT (!) switches the value to a 1 and the loop is executed until the connection is established. The rest of the function is similar to the WiFiConnect() function.
3.3 Results
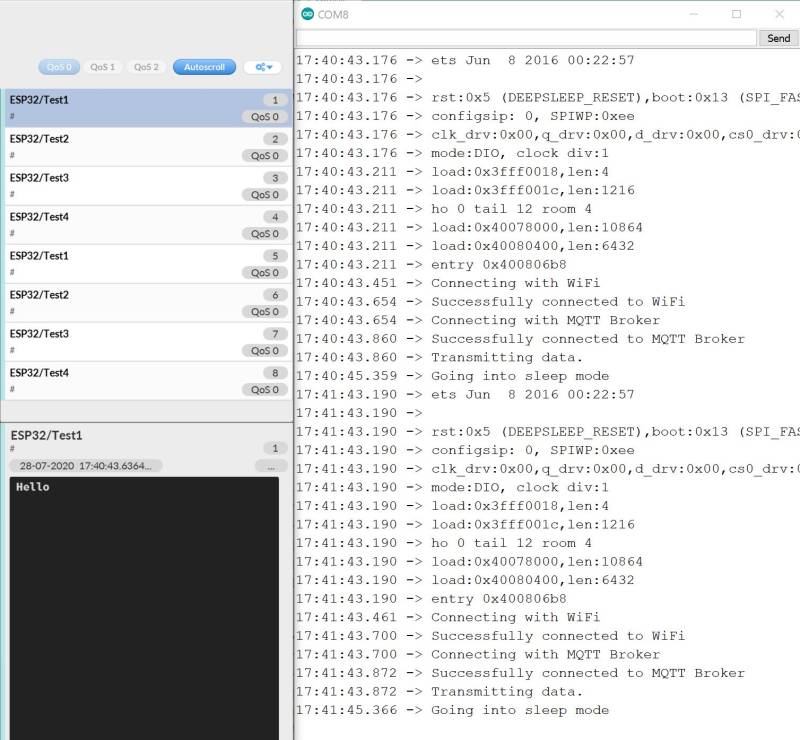
After starting the MQTT.fx client, connecting it to the mosquitto server and uploading the sketch to the ESP32, the results are printed to the serial monitor. When all topics are subscribed with the MQTT.fx client by subscribing to “#”, all of the 4 messages are printed to the monitor (figure 3).
The serial monitor of the Arduino IDE shows what is going on while the program sketch is executed. The WiFi and MQTT connections could be established without problems (no restarts of the ESP32 etc.).
The 4 messages were received in 1 minute intervals in the MQTT.fx client which is in accordance with the times displayed in the serial monitor. The 1 minute intervals are due to the ESP32 going into deep sleep and being waken up once a minute by the DS3231 interrupt.
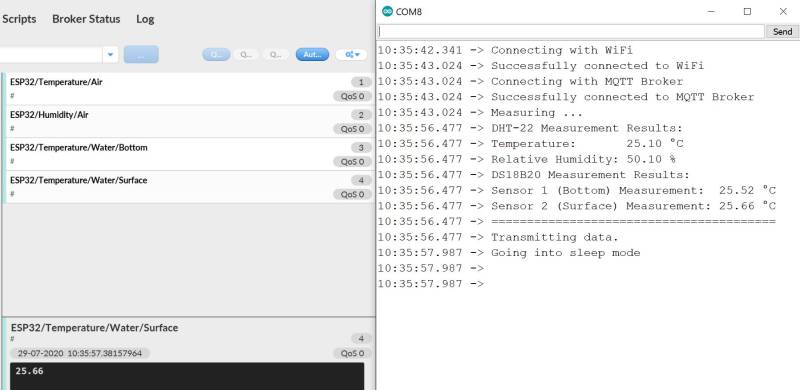
After the successful testing with the placeholder variables, the sketches for measurement and for MQTT transmission were combined to see if the transmission of sensor data would work as expected. The results were observed in the serial monitor and MQTT.fx (figure 4).
All sensors delivered plausible data, the temperature measurement values were all within 0.6°C of each other while measuring the room temperature. All measurements were transmitted successfully with MQTT once a minute due to the DS3231 interrupt.


